Lab Environment
We use the Jupyter interactive computing environment to conduct labs in this course.
See also
The rest of the material on the lab notebooks is partially based on the Jupyter Notebook documentation where the general usage of notebooks is described.
Notebook Cells
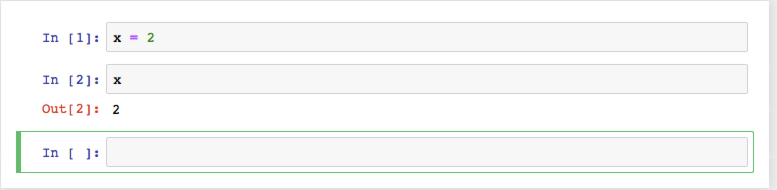
The lab notebooks are composed of cells where code can be executed using Shift+Enter.
For example, an assignment such as x = 2 can be executed on a cell and then,
the value of x can be retrieved by executing x on the next cell:
All actions in the notebook can be performed with keyboard shortcuts. Example shortcuts:
- Run cell:
Shift+Enter Execute the current cell and proceed to the next cell below. Creates a new empty cell below the current one if there is none. If there is an existing cell below, the cursor proceeds to that existing cell.
- Run cell:
Run cell and create a new empty cell below:
Alt+Enter- Command mode:
Esc The cell becomes inactive with no cursor indicating that keyboard shortcuts can be used to change the mode of the cell such as:
create a new empty cell down below by pressing
bcreate a new empty cell above by pressing
adelete the current cell by pressing
ddcopy the cell into clipboard by pressing
cpaste the cell in the clipboard below the current one by pressing
v
- Command mode:
- Edit mode:
Enter The cell has a blinking cursor indicating that the text in the cell can be edited. Full list of keyboard shortcuts is listed by clicking on the keyboard icon in the toolbar.
- Edit mode:
Lab Notebook
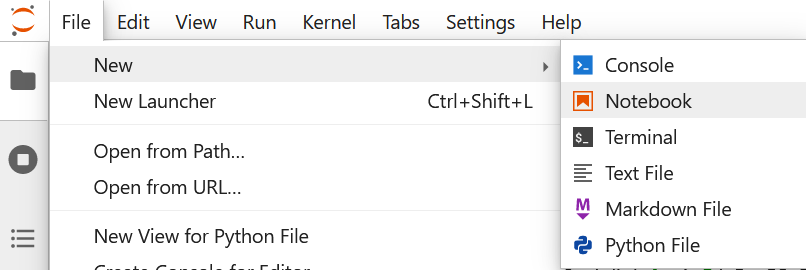
Use File  New Notebook to open a new notebook.
The labs are conducted using the University of Houston Education python libraries. Load these libraries by executing the following code in the first cell of your lab notebook:
%load_ext uhed
You can now proceed with loading of the lab modules for this class:
%lab
Select your lab topology from the dropdown menu and
then load by clicking the Build Network button.
How-to Guide to Answering Questions
On the lab notebook, there are practice questions to solve on your own.
This feature loads by executing %practice in a cell.
Once the question is loaded and you
have completed your answer, you can click on the Grade
button under the question to instantly receive feedback from the autograder.
Here is an example walk-through for the practice questions related to MAC learning in Ethernet bridges.
Suggested workflow for completing practice questions:
For a given question, examine the panels. What information is provided about the network?
Read the question text, and re-examine the panels. What state is the network in? Can you infer the general behavior from observations of the given data?
Determine and take a note on what protocol behavior you would expect given the network data and the scenario referred to in the question.
Attention
Once you click on the Grade button, it will display a Correct or
an Incorrect message in the text box below the Grade button. You can
change your answer and click on the Grade button again to evaluate your
answers.
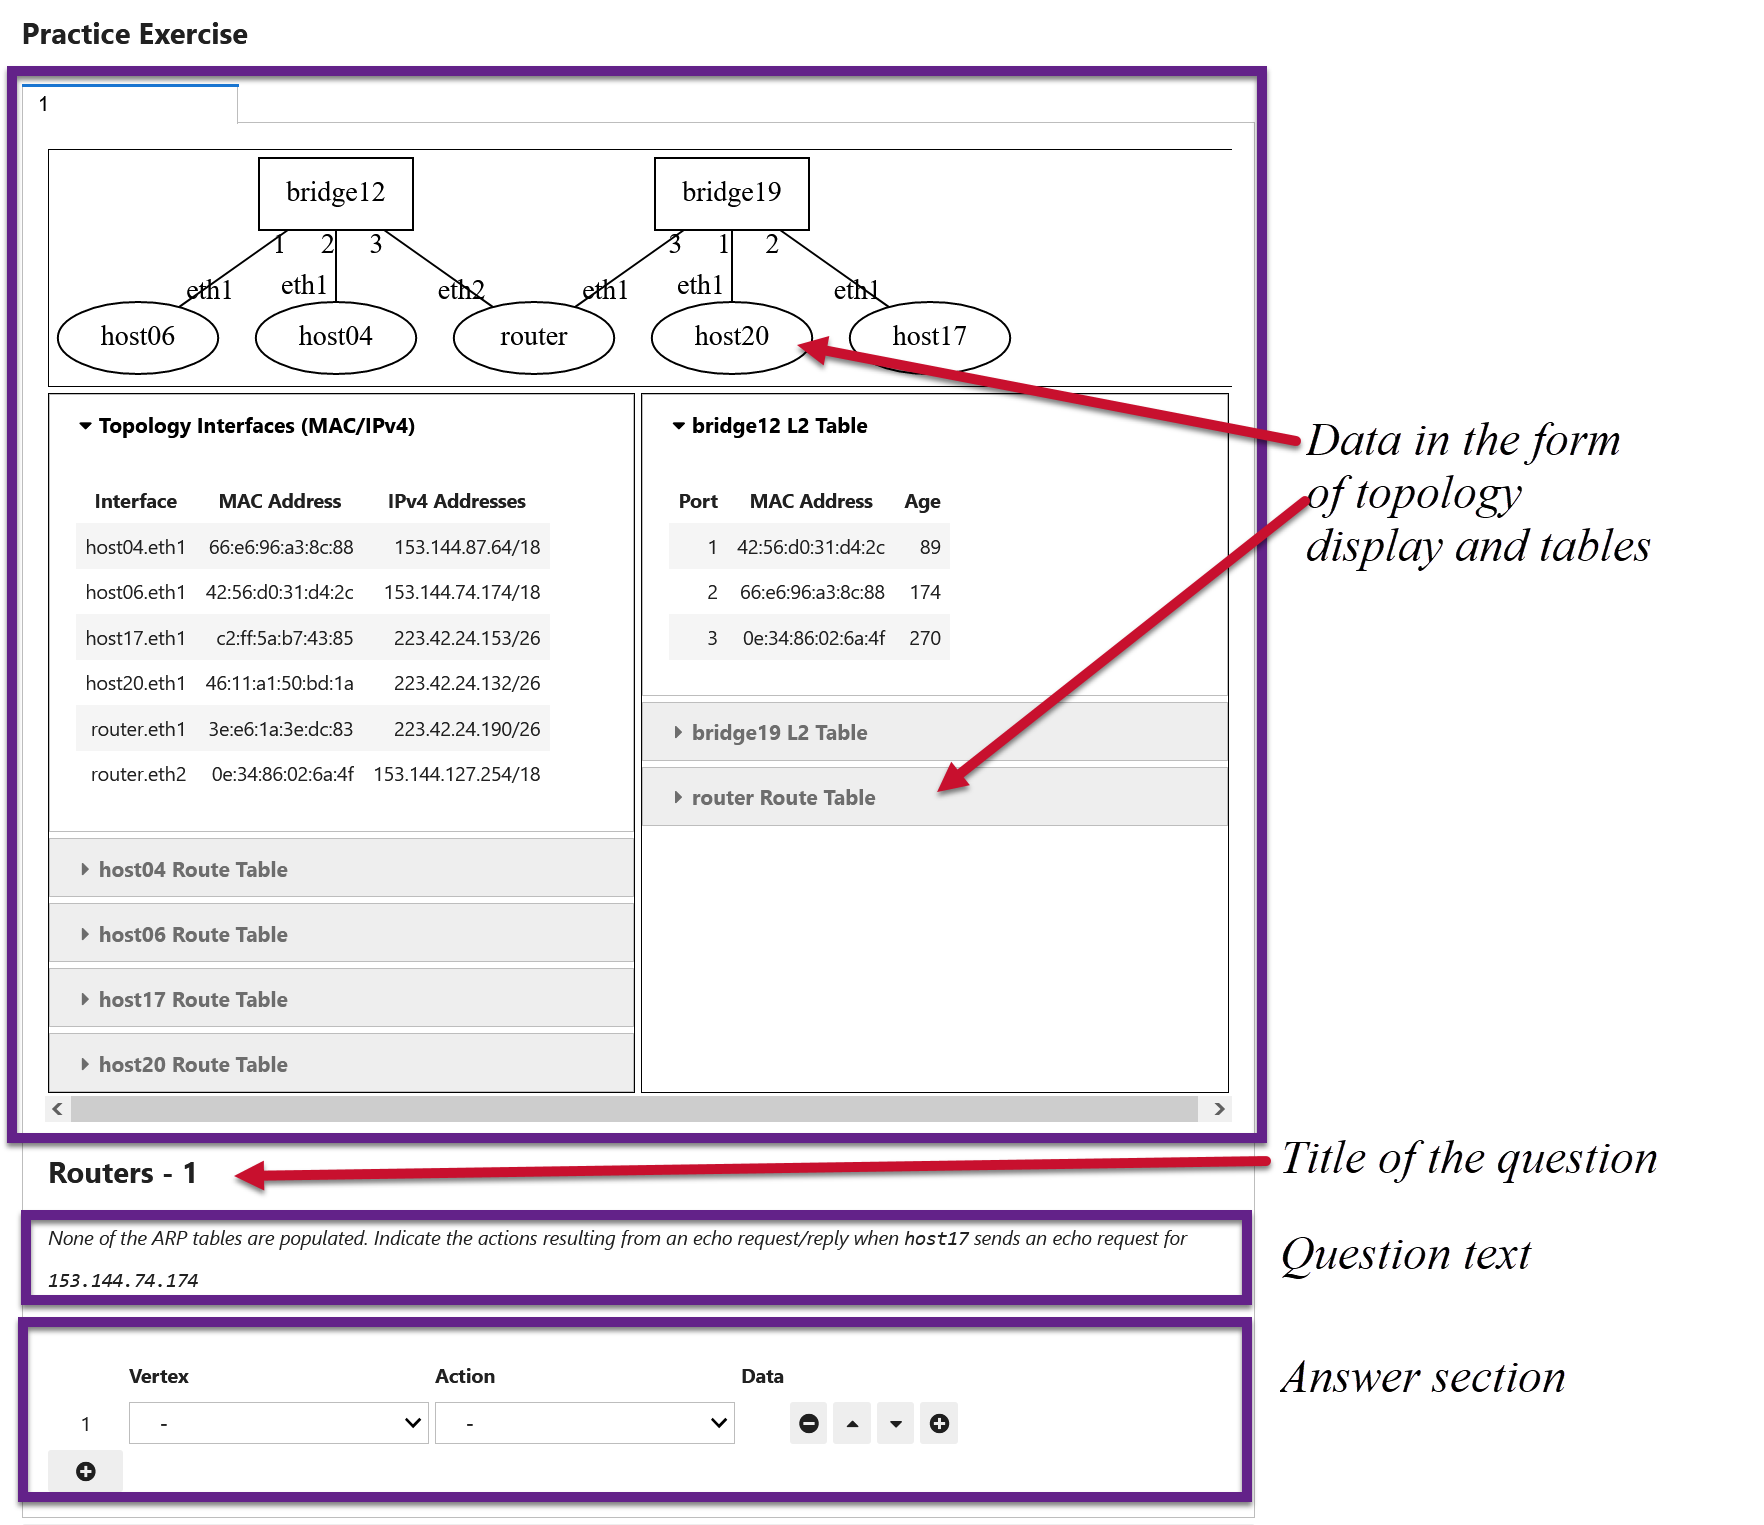
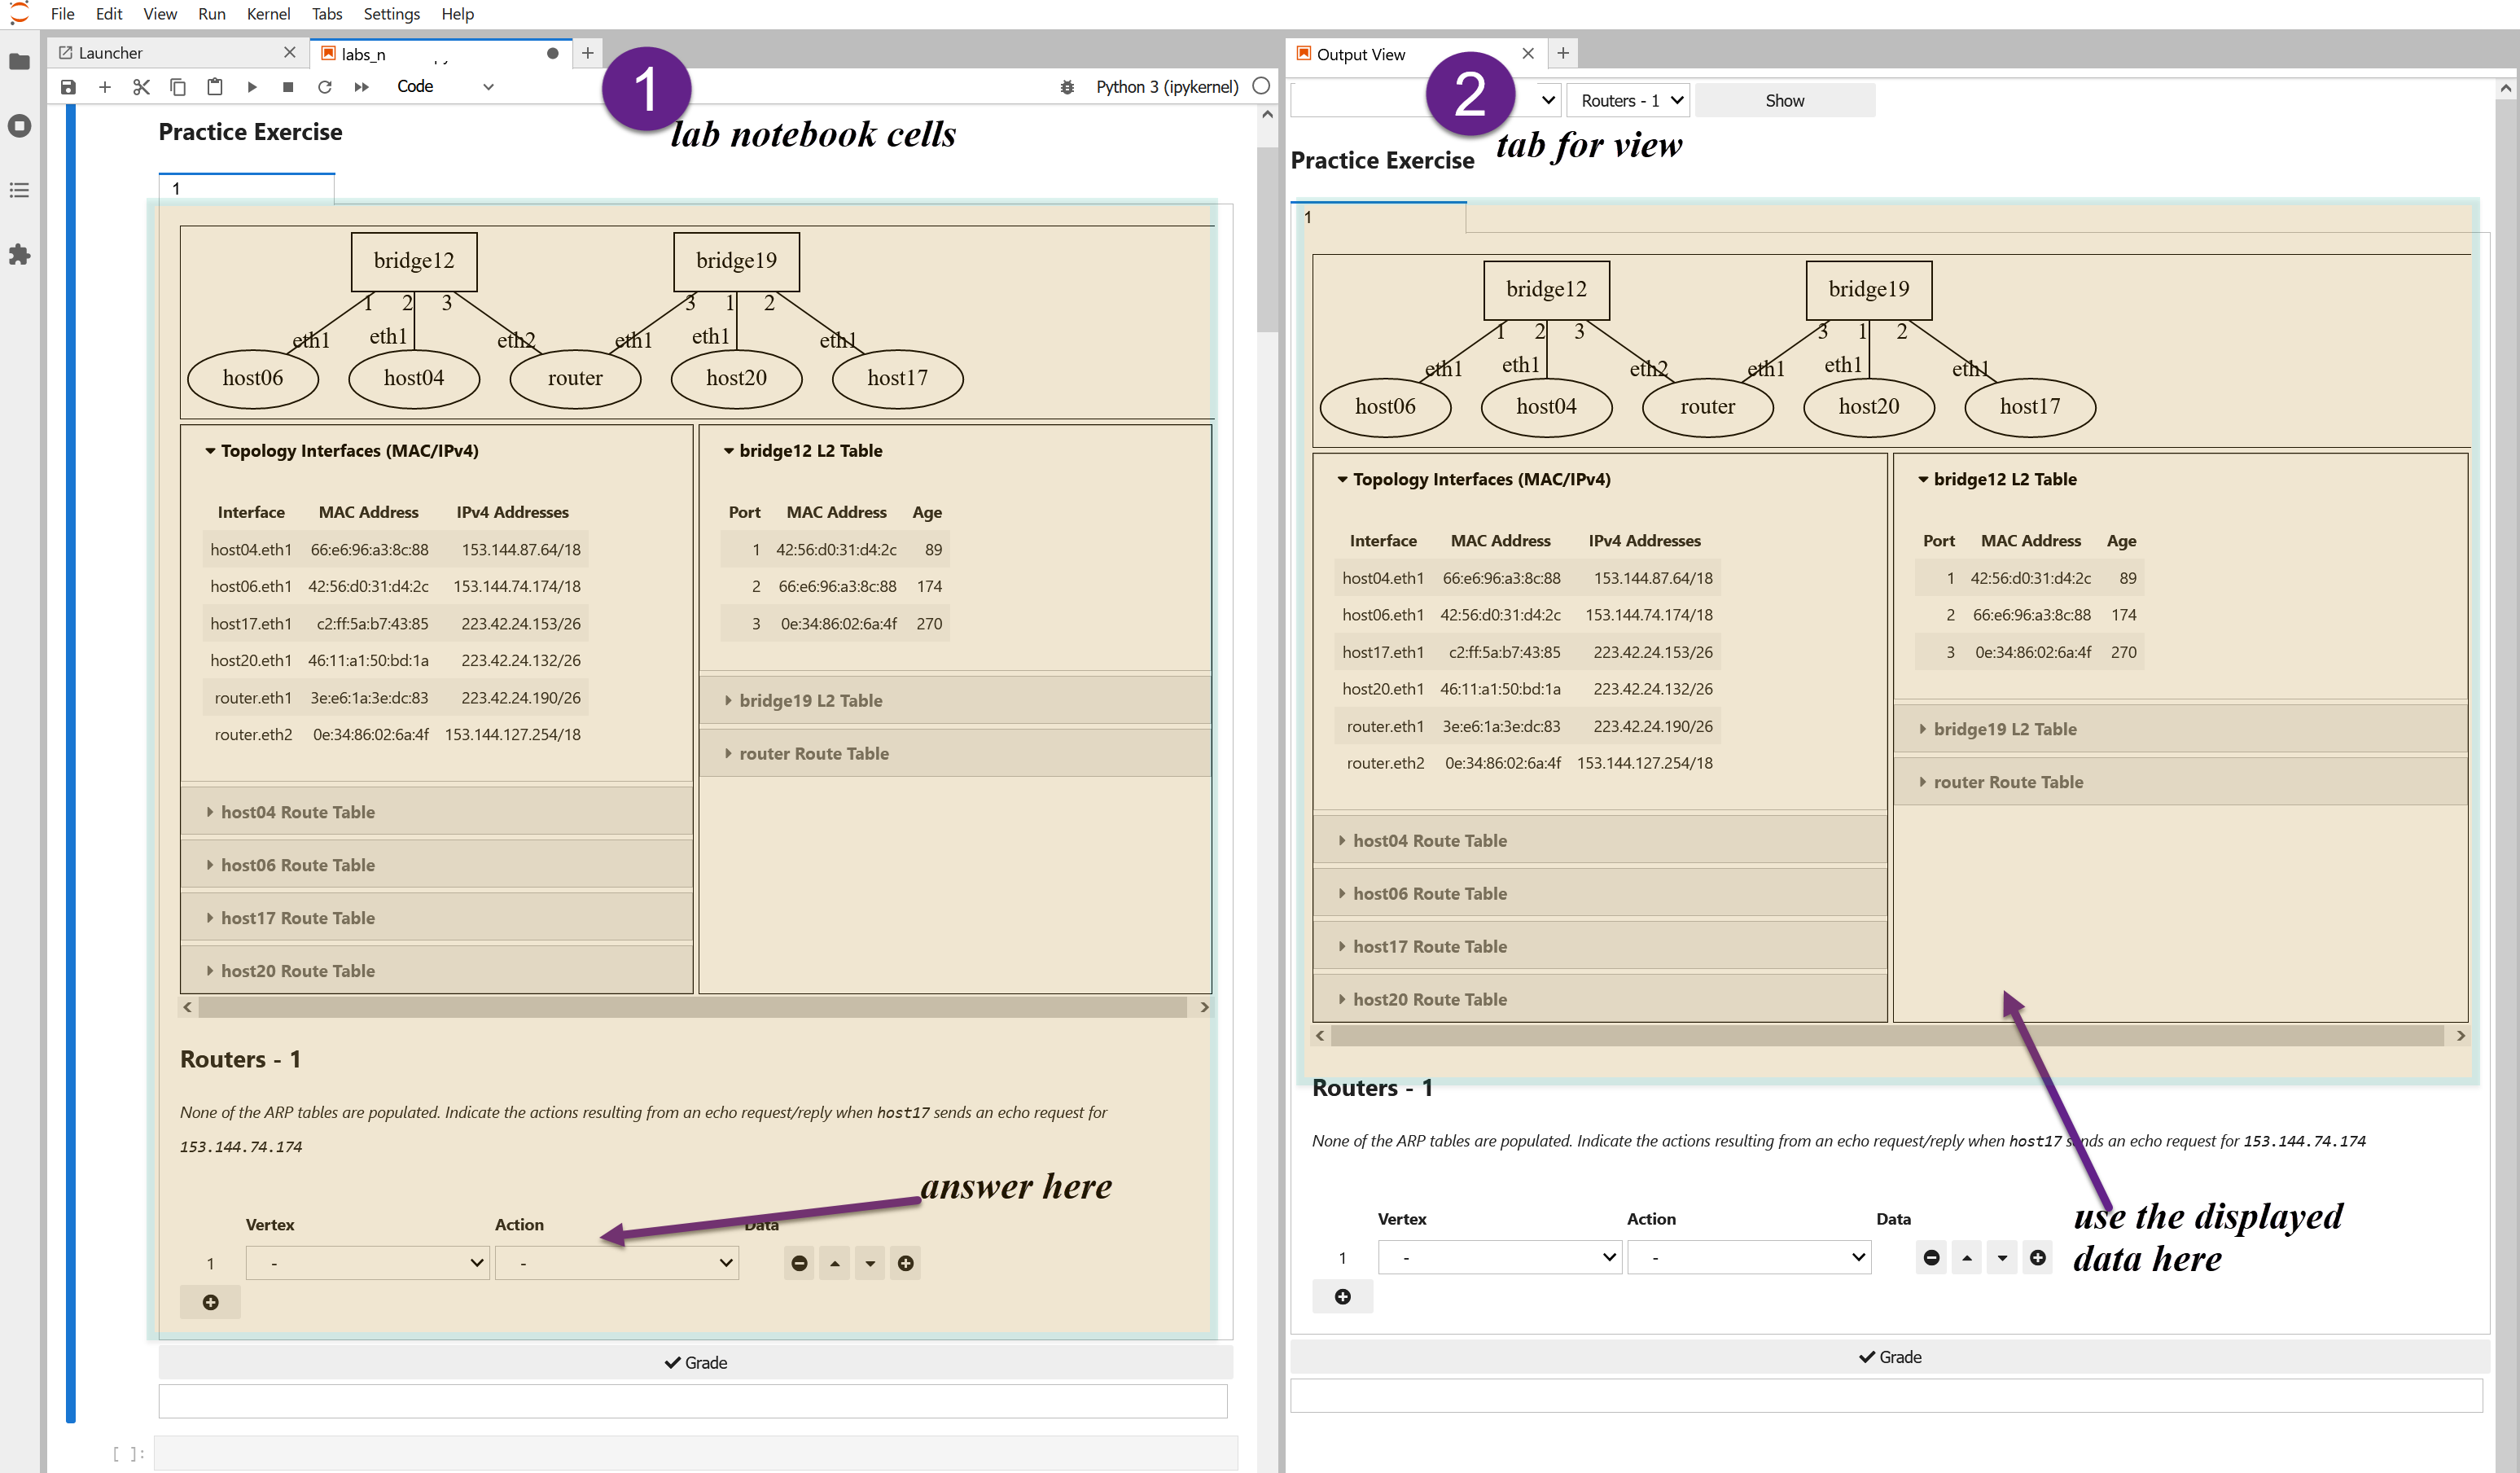
Each question is composed of a data at the top, a question title and text in the middle, and then an answer section at the bottom of the display.
Components
The data display section may include a network topology diagram. The diagram is composed of the network nodes that are connected with links that represent the layer 1 connections between the devices. The device names are displayed in each node. The links may have labels that indicate the port numbers of Ethernet bridge devices, interface names of end hosts and routers, and other information as applicable.
The data display includes tables such as route tables, ARP tables, or the bridge port configuration tables in addition to sometimes a table of all interface information on the network topology.
The question section has a question title (indicating the overall context of the question) and the question text. The text provides the references to the network data either by name of the network node or by a piece of information for an interface such as an interface address.
The answer section of the display has a number of entry mechanisms. Below, we provide details on how to enter the solution to the question in each mechanism.
Recommended Method
Please make sure to examine ALL information that is provided in the data and question sections before attempting to solve a given question. It is helpful to take notes of some of the salient pieces of information such as port STP state and the subnets. In addition, in order to have an easier view of the answer section and the data, please create a new view using the steps outlined below.
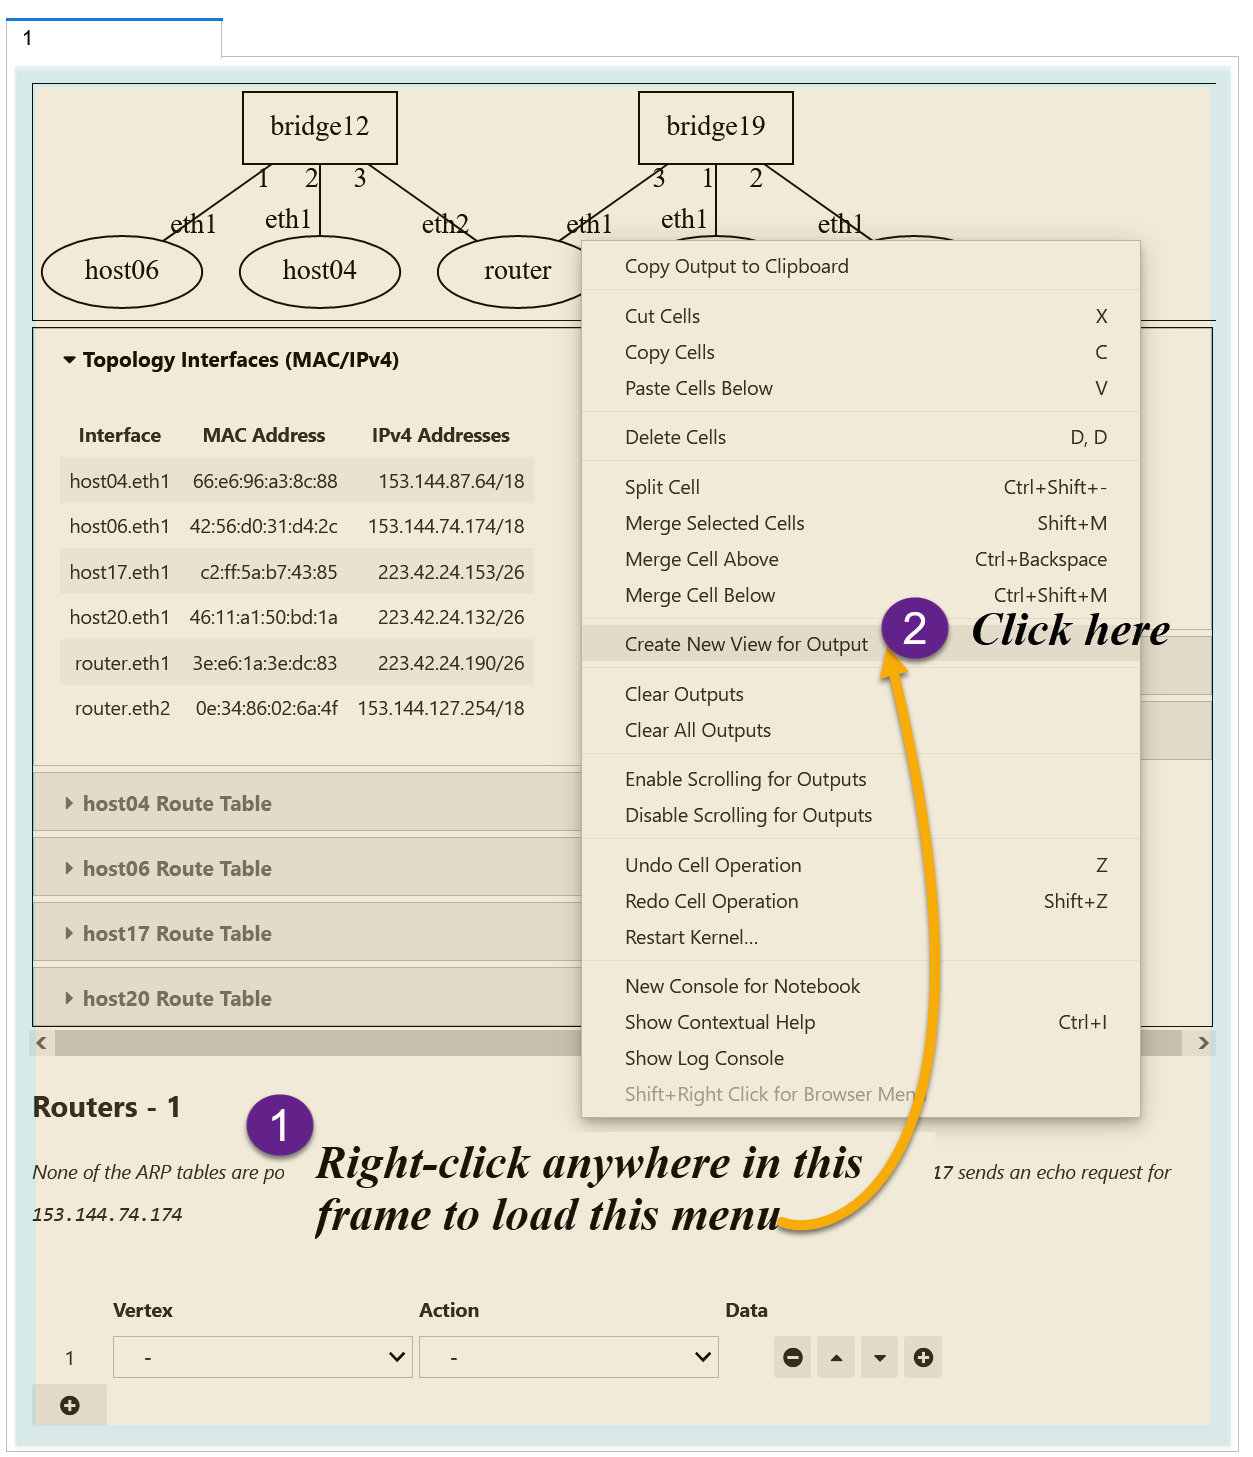
Move the tab that displays the frame side by side on your browser screen.
Answer Tabs
If there are multiple questions at the output of a call such as %exam
or %homework (equivalently, NET.submit()), you can navigate between
the questions by clicking on the tabs.
Interface List
There is a subnet entry box that you can enter text (e.g, 10.0.1.0/24) for the subnet entry along with a list of rows for interfaces.
Attention
Subnet entries are in the form A.B.C.D/N where N is the prefix length and A.B.C.D is the first IP address in the subnet range. For example, some valid subnet entries are below:
10.0.1.0/24
205.53.11.128/26
Please examine the answer fields on the display:
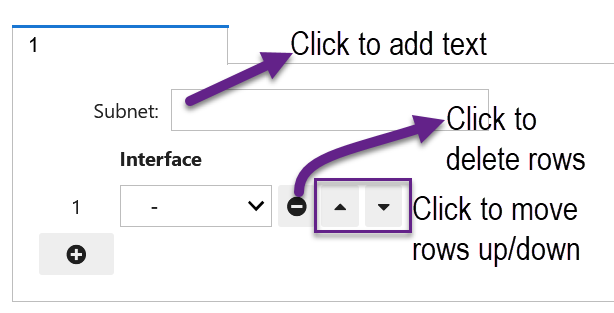
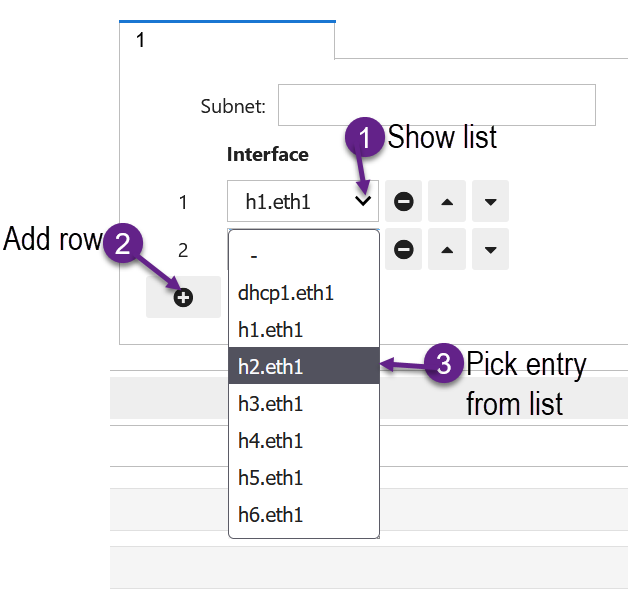
The interface entry mechanism is a list of rows. Click the down arrow to see the list of entry options and choose the entry to add to the row. To add another row, click on the plus button. To delete or to move, please use the buttons to the right of each entry on a row.
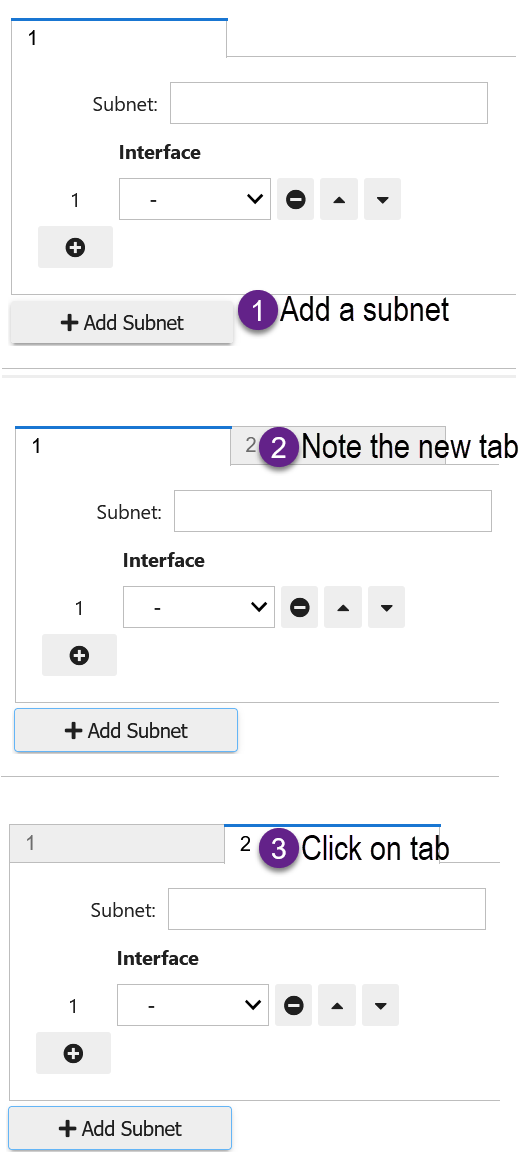
When submitting multiple tables of lists, please use the Add Subnet
button to create a new tab. In each tab, complete selection of entries
and include the subnet text.
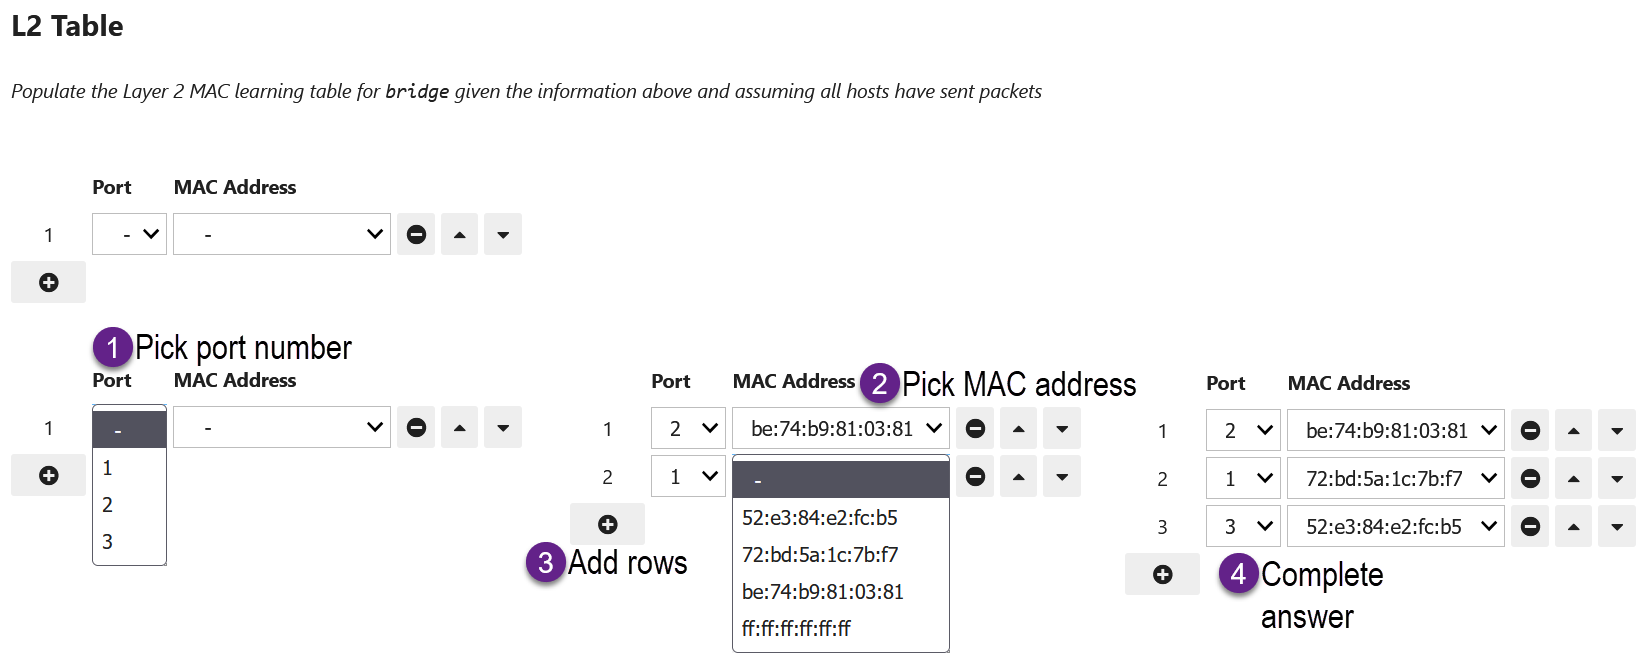
Example: L2 Table
Here is an example flow of entries made to complete the answer to a question that is asking for the layer 2 table of an Ethernet bridge.
Action Rows
The answer entry mechanism for actions list is through rows of vertex, action, and if needed, a data item. The question text will provide the context for the actions that need to be listed in the rows:
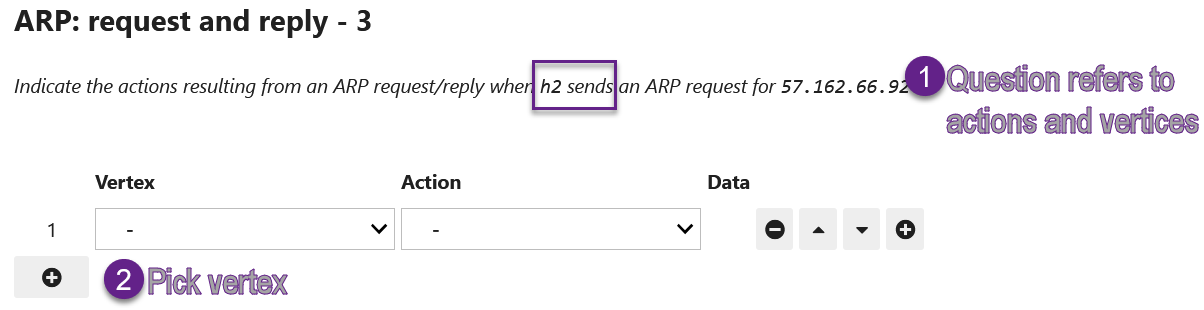
Pick the vertex in the first column for a given row.
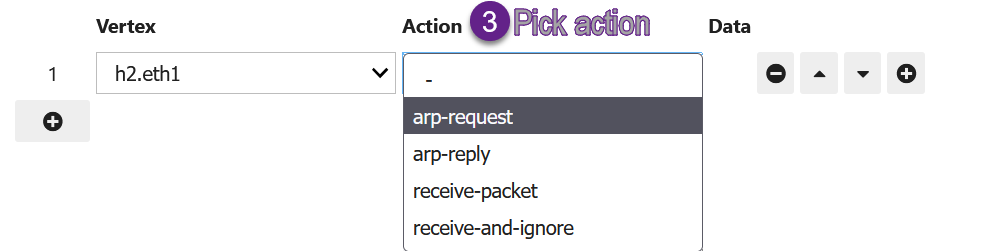
Each vertex type has a different set of actions that will load into the list of available entries. Pick the action at this step:
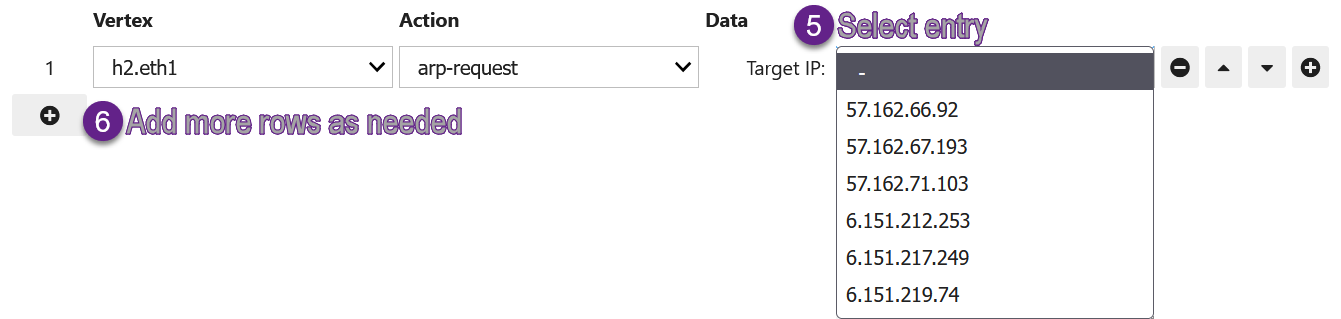
If there is a data item to be entered for a specific
(vertex, action)pair, theDatacolumn will appear with entries listed in the dropdown.

Pick the data entry from the dropdown list.
Finally, after completion of a row of entries for
(vertex, action, data), if there are more actions in the answer to the question, please add more rows and repeat the process starting from step 1 above.
Practice Questions
On the lab notebook, there are practice questions to solve on your own.
Once the question is loaded and you
have completed your answer, you can click on the Grade
button under the question to instantly receive feedback from the autograder.
Here is an example walk-through for the practice questions related to MAC learning in Ethernet bridges.
Suggested workflow for completing exercises:
For a given question, examine the panels. What information is provided about the network?
Read the question text, and re-examine the panels. What state is the network in? Can you infer the general behavior from observations of the given data?
Determine and take a note on what protocol behavior you would expect given the network data and the scenario referred to in the question.
If an action sequence is required: Start working on selecting the vertex, action, and data information based on your answer.
If a particular network device state is required: Start working on selecting the entries for the device-specific table.
Attention
Once you click on the Grade button, it will display a Correct or
an Incorrect message in the text box below the Grade button. You can
change your answer and click on the Grade button again to evaluate your
answers.
Load the %practice
Load the practice by executing the
%practice command in a cell in the notebook.
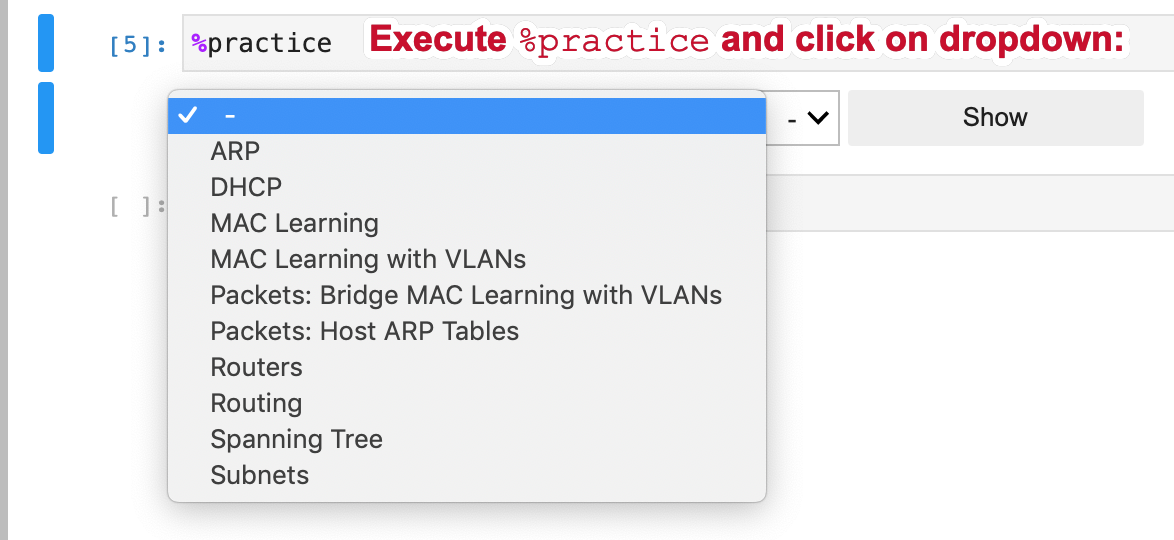
The dropdown menu shows all of the subjects available for practicing in the lab notebook.
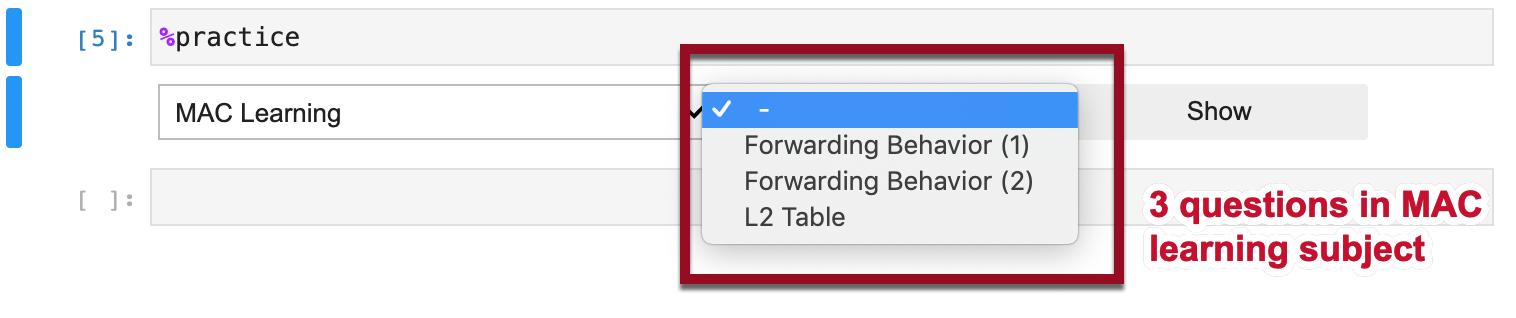
The dropdown menu to the right of the subject has the corresponding questions
in the subject MAC Learning.
Components of the display
Detailed descriptions of question data
The panels in the question show network topology diagram and the network data.
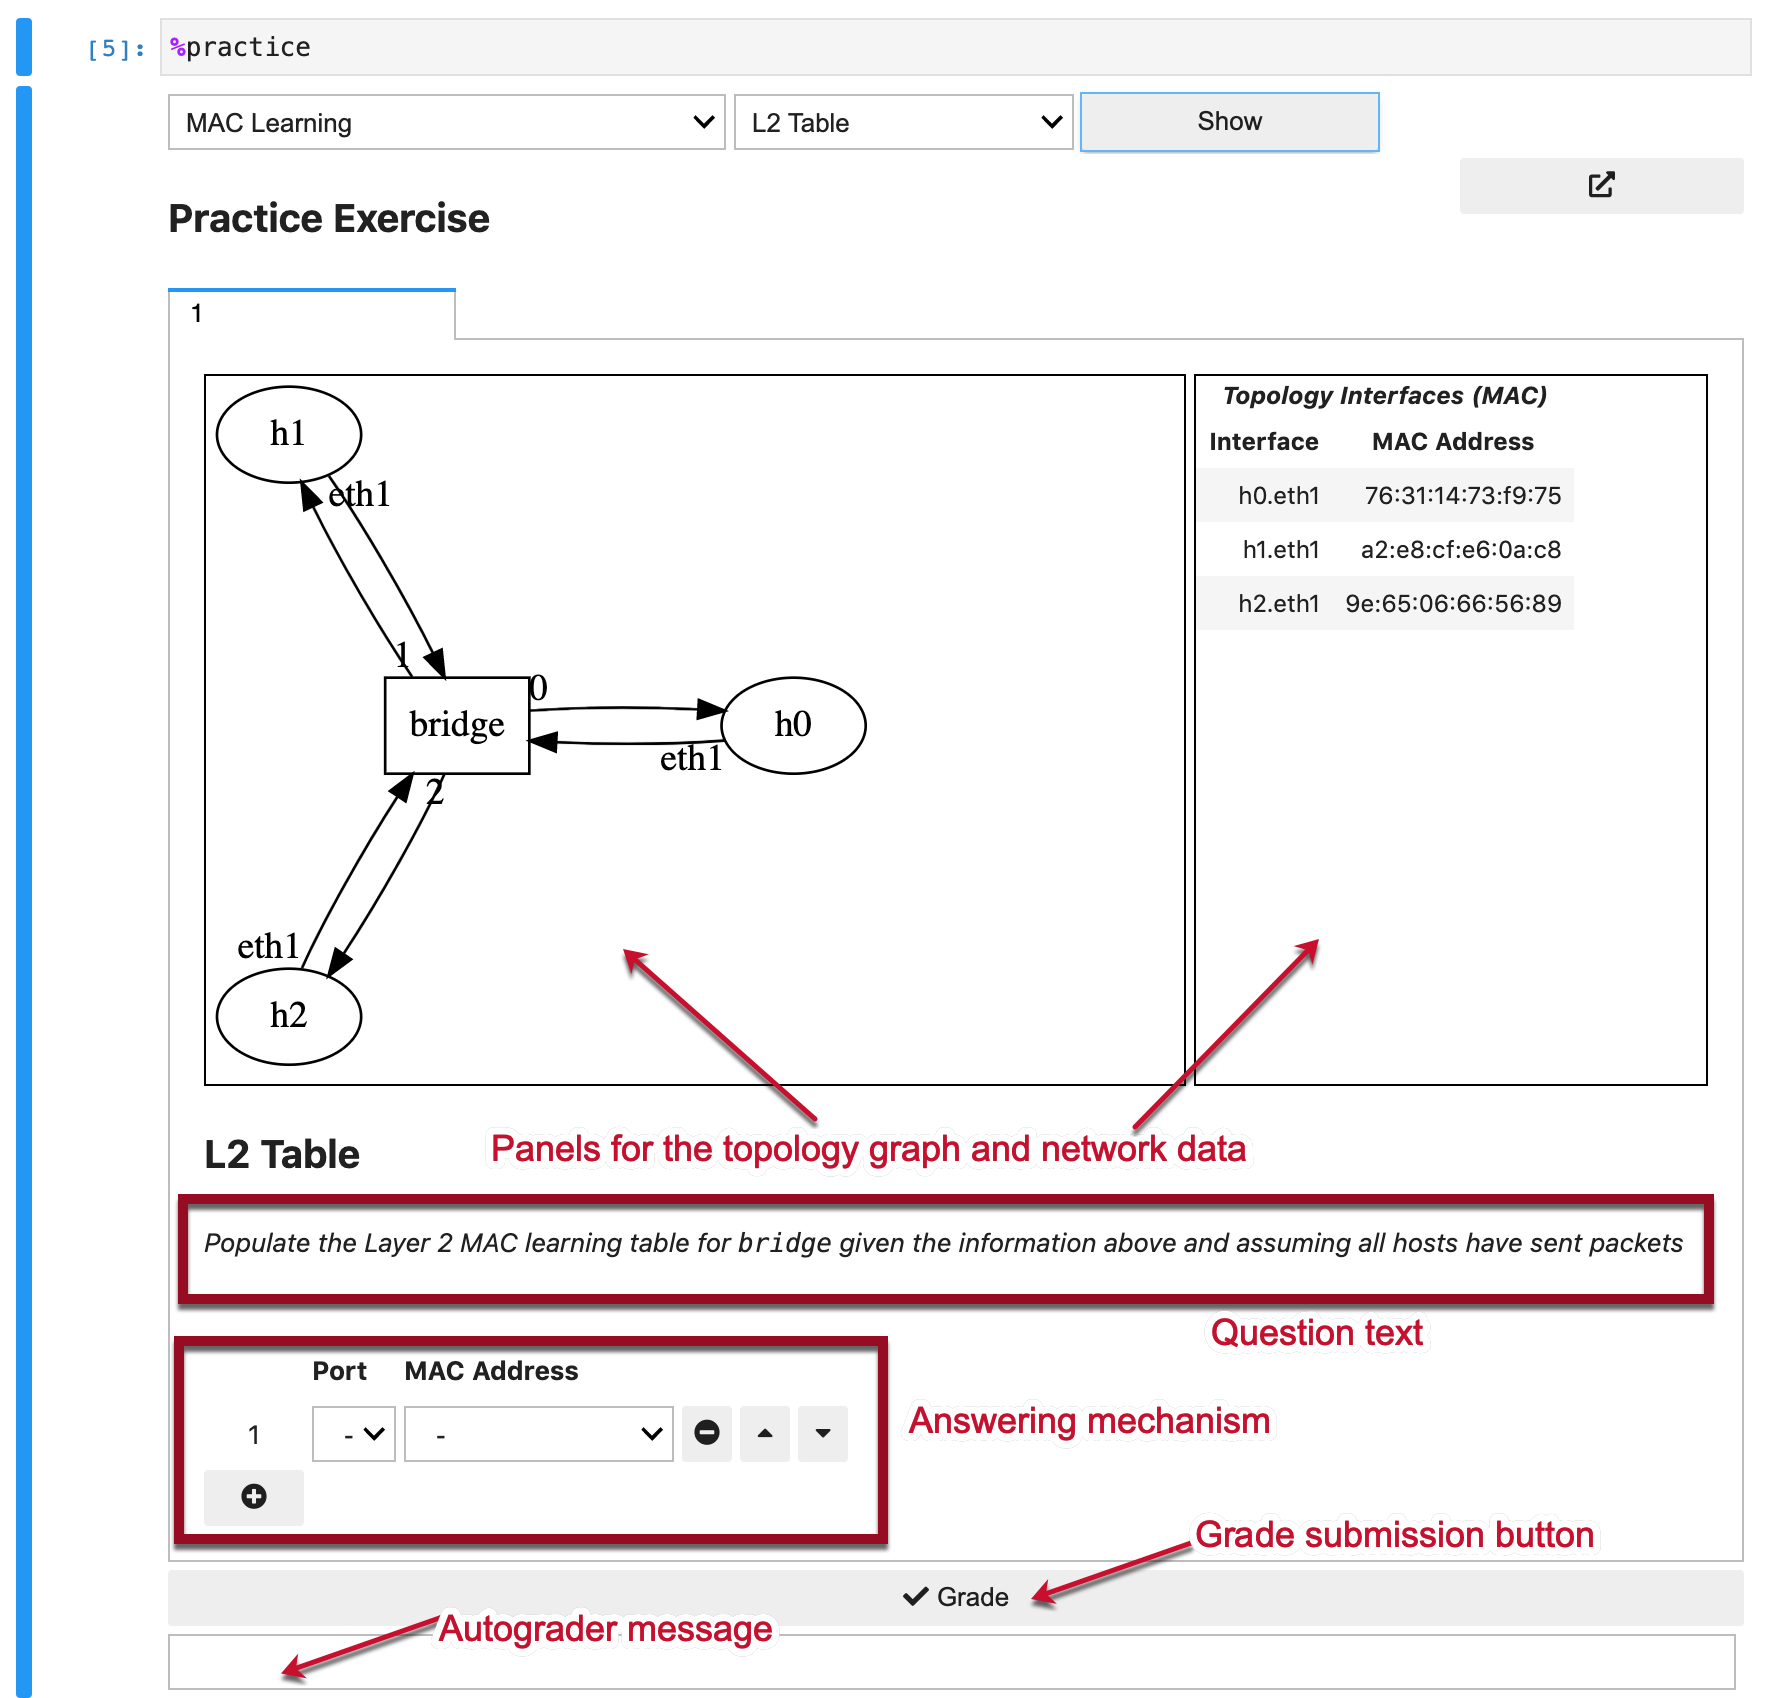
Inside each question, please examine the panels for the data provided to you.
The question provides data about the network status: topology and the state of
network and end devices. For example,
this question is on determination of the bridge L2 table if all hosts have
sent a packet already.
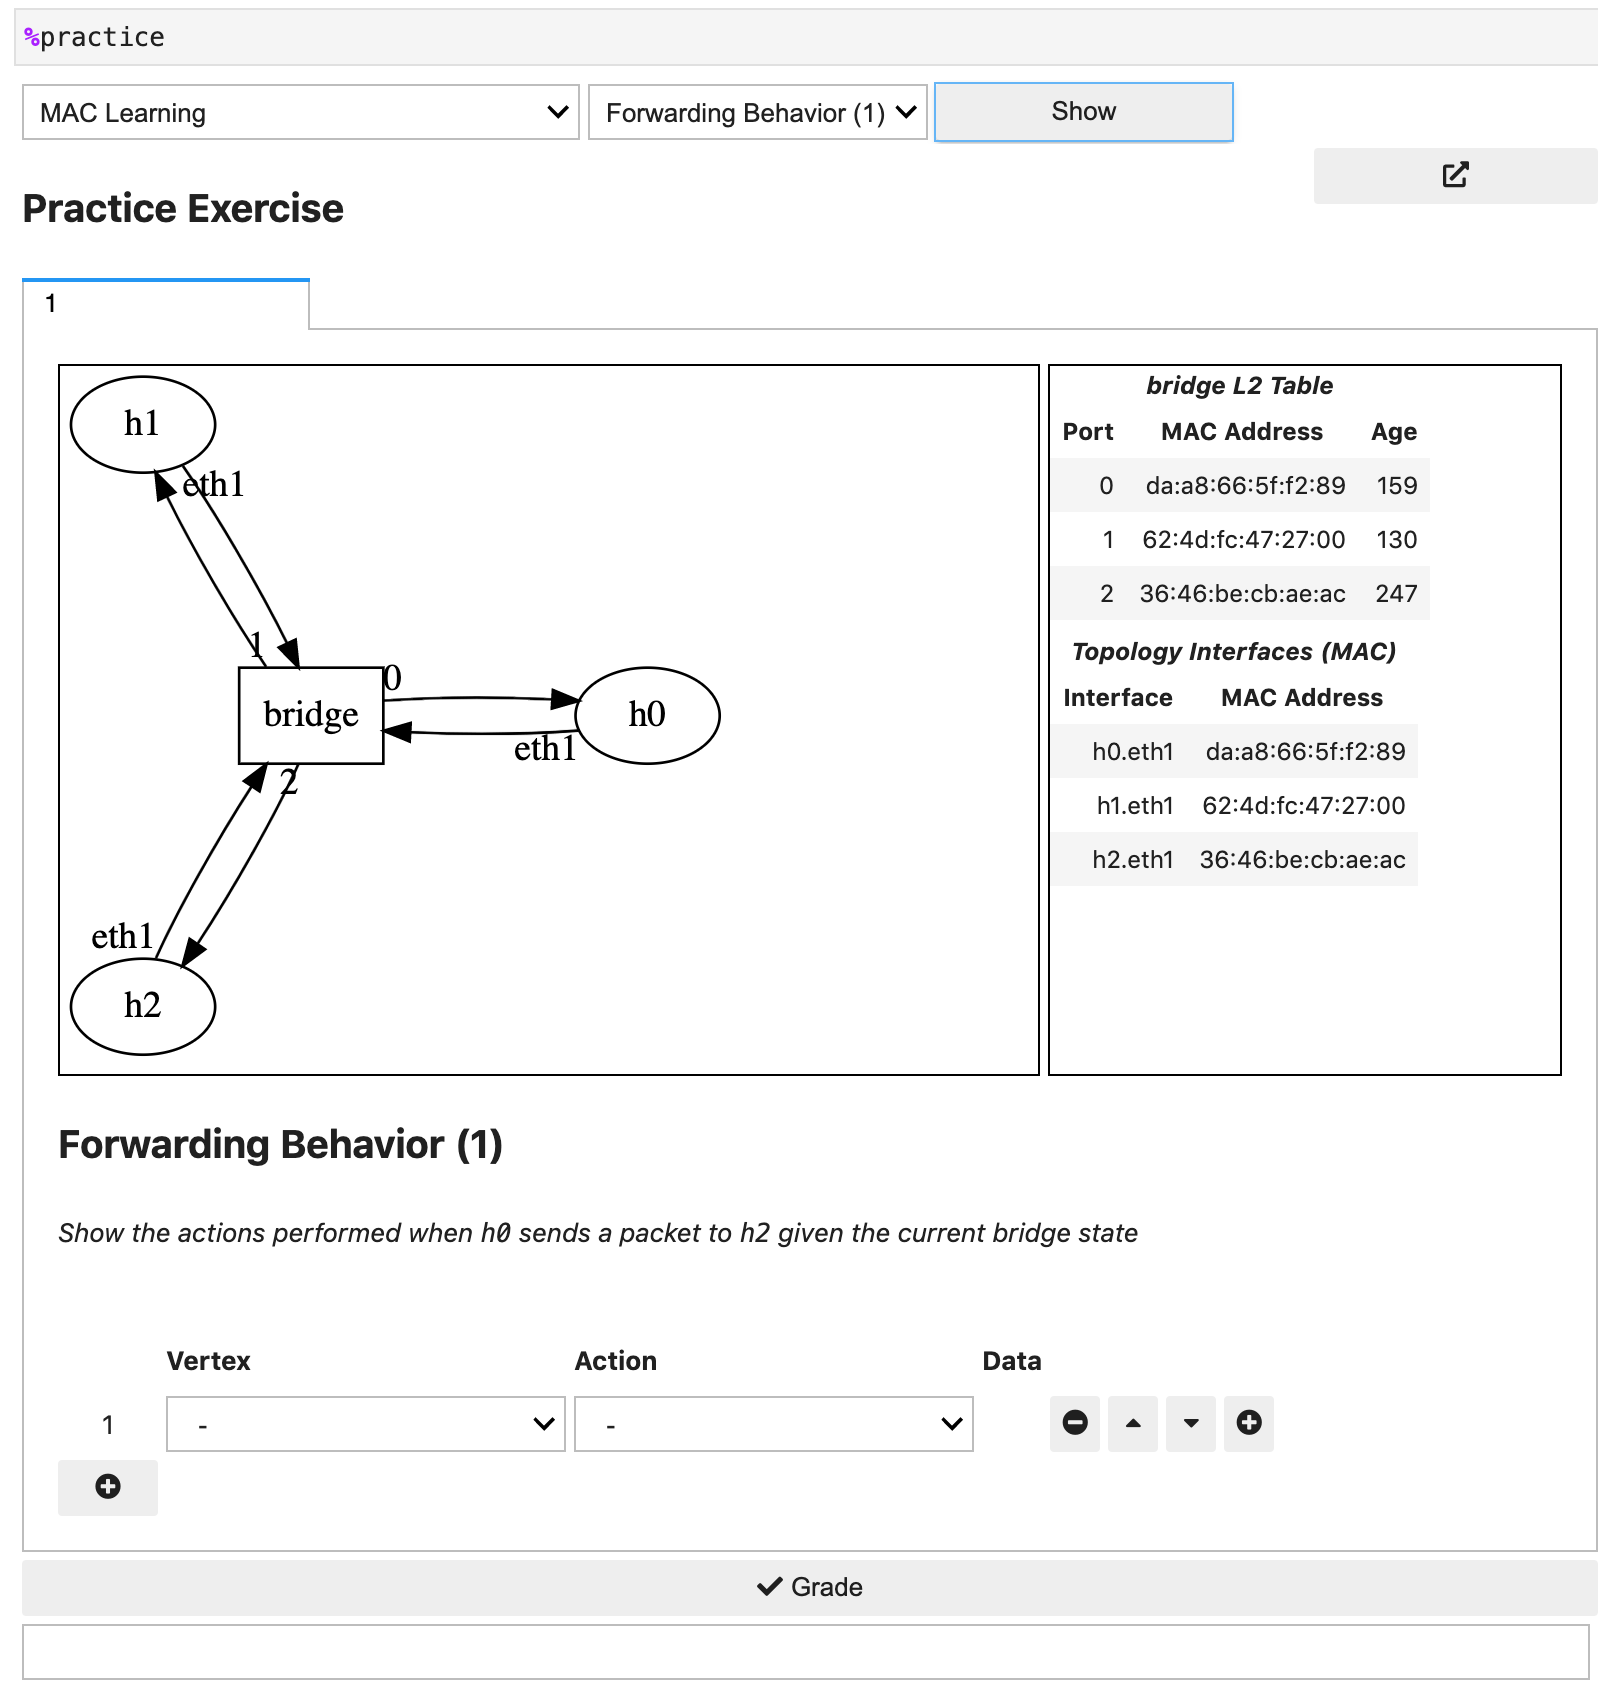
There are two questions on packet forwarding behavior of the bridge. The first
one is called Forwarding Behavior (1).
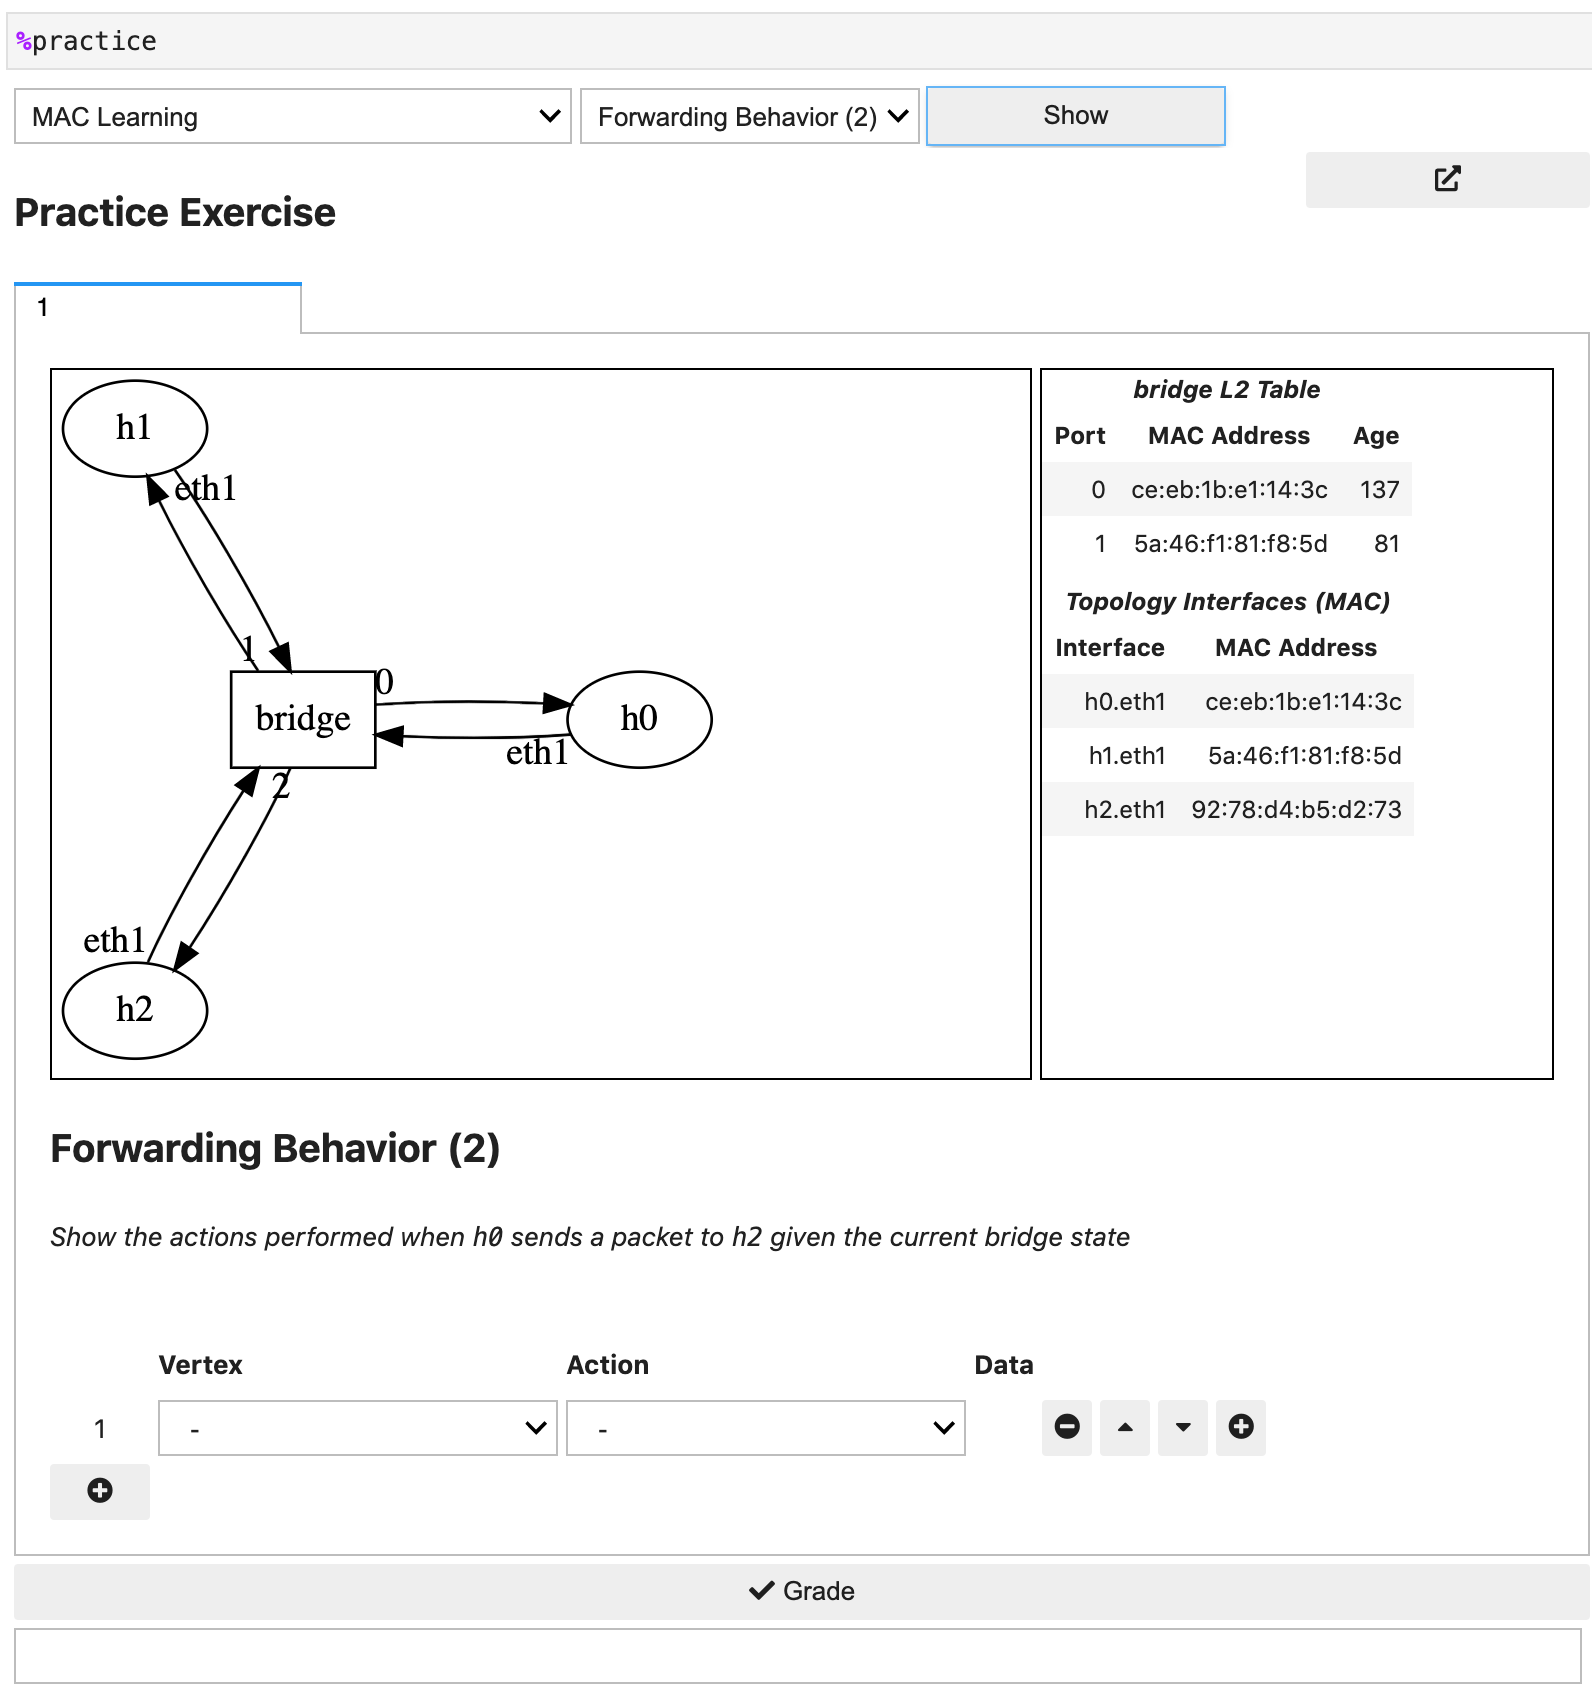
The second one is called Forwarding Behavior (2).
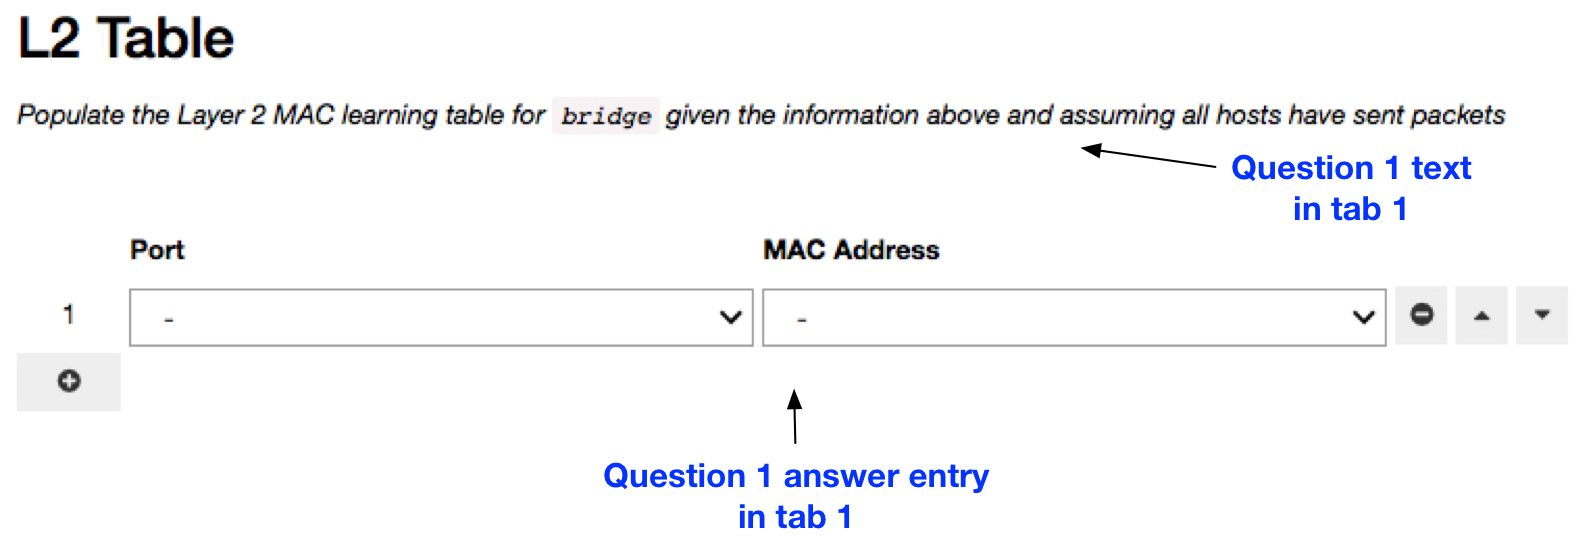
Answer mechanism
Determine L2 table entries for the bridge in this scenario:
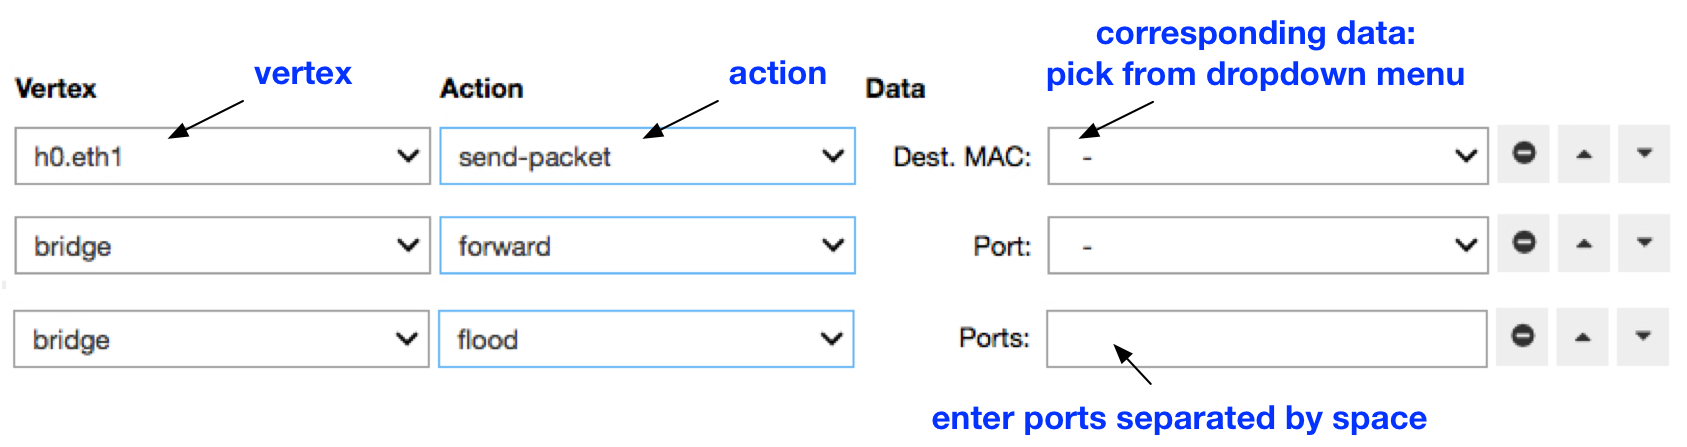
The forwarding behavior actions trace the packet through the network vertices.
The action entries are dynamically loaded along with the data expected for each action.
For example, a host vertex sending a packet on its interface eth1 will need the packet’s
destination MAC address specified when entering this action.
If a bridge vertex in the network graph is forwarding the outgoing
ports should be specified as part of the data part of this action.
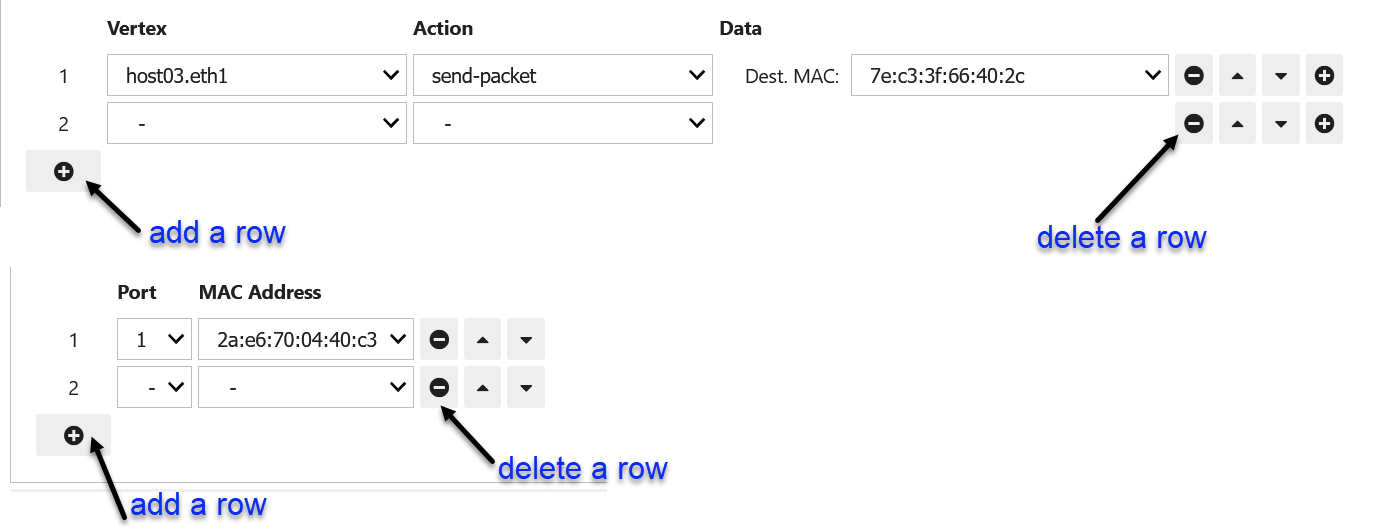
Please use the add- and delete-row buttons in the answer area to provide the required entry rows for each answer type.
Terminal Access
Use
File
New
Terminal
to open a new terminal on the lab server.
This CLI will be used to access the devices in the lab network topology
by ssh into these devices:
$ gssh <username> <device-name>
For example, a <username> can be dgurkan and the <device-name>
can be a host device named host1 in your lab network.
In order to ssh into
this device, type:
$ gssh dgurkan host1
on the terminal commmand line and press enter.
Lab Completion Tasks
Every lab should be completed by following the instructions below on how to delete the network topology resources and the running processes on the lab service.
Delete all reserved resources for the lab by executing the %delete command in a cell.

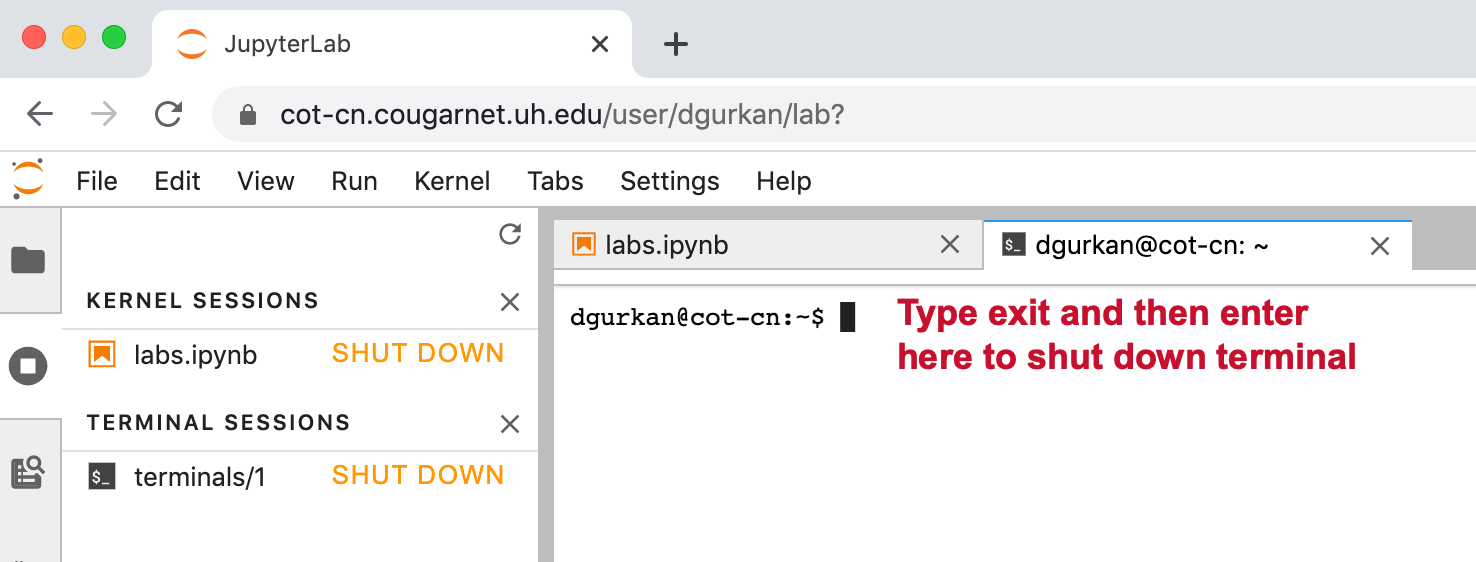
Type exit and then press Enter at the terminal
and verify that the terminal application also closes.
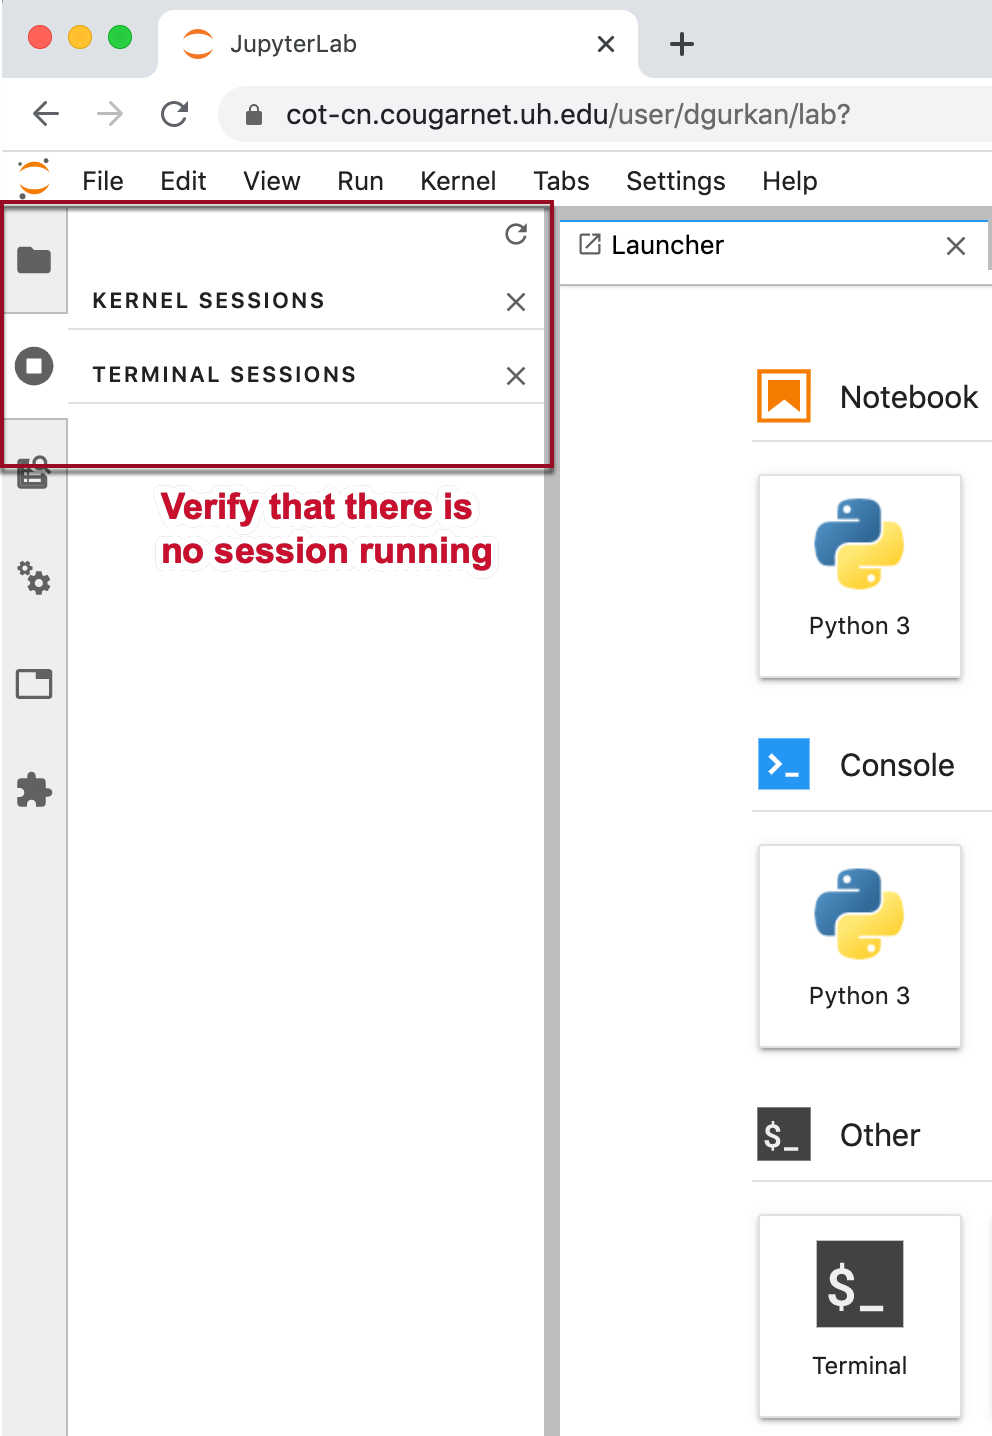
When you are done with your work on a lab notebook, there should be no running sessions as shown in this view.
Notetaking in the Lab Notebook
You can take notes in the lab notebook cells by markdown formatting option in the cell. Turn the cell type to markdown by:
While in the cell, stop cursor by pushing the
ESCkeyPress
min your keyboard to convert cell into markdownType in your text with light formatting. For example, bullet points can be added using the following:
* bullet 1
* bullet 2
* ...
Heading can be added by:
# Heading level 1
## Heading level 2
### Heading level 3
The markdown cell will render the text in the format you have specified when you execute the cell by pressing Shift and Enter at the same time.
The cell style can be changed from its default code to
markdown mode using the instructions below.
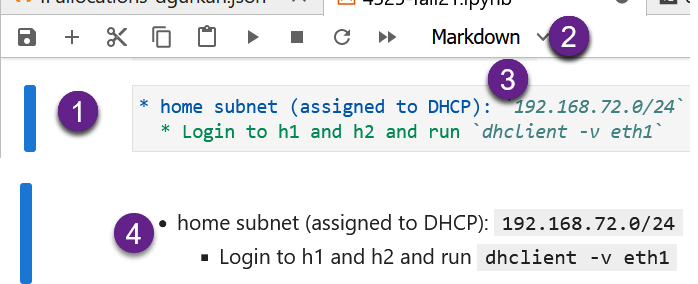
Press ESC key to deactivate cursor
Pick Markdown option from dropdown for the cell (or press m)
Type simple text instructions and task descriptions. For example, * character provides bullet items
Execute cell to render the formatted text