Lab - 1: MAC Learning in Ethernet Bridges
Objectives
The lab is on observations of:
Ethernet protocol packet format
how Ethernet network interfaces of hosts send and receive packets
how an Ethernet bridge forwards packets and learns MAC addresses
how an Ethernet bridge handles various MAC addresses
Note
Lab Environment
Every lab manual in the class is composed of these sections:
Objectives: observations and investigations as learning goals
Load Lab Network: reserve a lab topology
Topology Orientation: the network topology, hosts, and network devices and the means of interactions within the lab notebook
Observation Plan and Environment: an observation plan for the learning objectives of the lab such as packet send and receive nodes, and possible actions on the lab notebooks
Detailed instructions on what investigations to conduct,
New tool introductions
Other relevant skills that help in protocol observations
Learning Activities: specific lab activity tasks and homework
Load Lab Network
Use File  New Notebook to open a new notebook.
The labs are conducted using the University of Houston Education python libraries. Load these libraries by executing the following code in the first cell of your lab notebook:
%load_ext uhed
You can now proceed with loading of the lab modules for this class:
%lab
Select your lab topology from the dropdown menu and
then load by clicking the Build Network button.
In order to conduct this lab, please select the lab for Ethernet
MAC Learning in the labpicker dropdown menu and then click on
the Build Network button.
Topology Orientation
The hosts, h0, h1, and h2 are connected to an ethernet bridge
at its ports 0, 1, and 2, respectively. The topology diagram shows the
layer 1 connectivity of the hosts and the bridge. Host interfaces and the
bridge are running the Ethernet protocol to forward packets in this
network. Use the network function NET to display the topology
of the lab by executing the command below in a cell:
NET.showTopo()
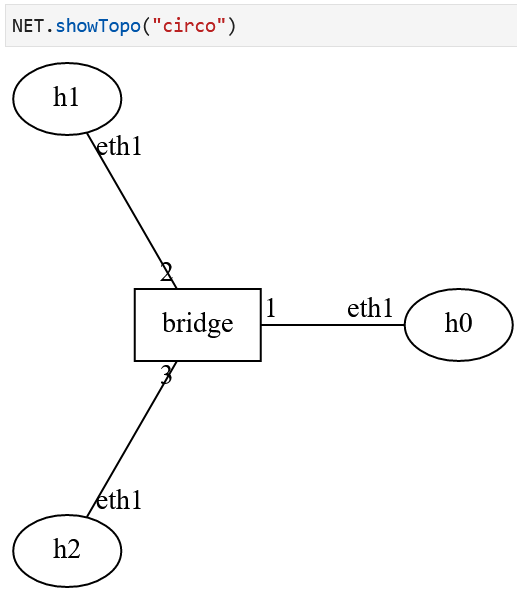
Lab Network Topology Displayed on the Lab Notebook
Note the labels of hosts, h0, h1, and h2, and the bridge
name, bridge on the topology.
Observation Plan and Environment
Prepare your lab environment for specific observations on Ethernet MAC learning bridge behavior.
Open a terminal for each host, ssh into the host using the CLI command
gssh <username> <hostname>in each terminal. Identify the labels of each node in your network by displaying the topology using the commandNET.showTopo().Identify the host network interfaces using the
NET.showInterfaces()command in your lab notebook.Then, run tcpdump to listen at each host network interface.
On the lab notebook, execute
NET["bridge"].getL2Table()to retrieve the current state of the L2 table.Open an additional terminal for two of the hosts, ssh into the hosts to run the script that sends one packet at a time.
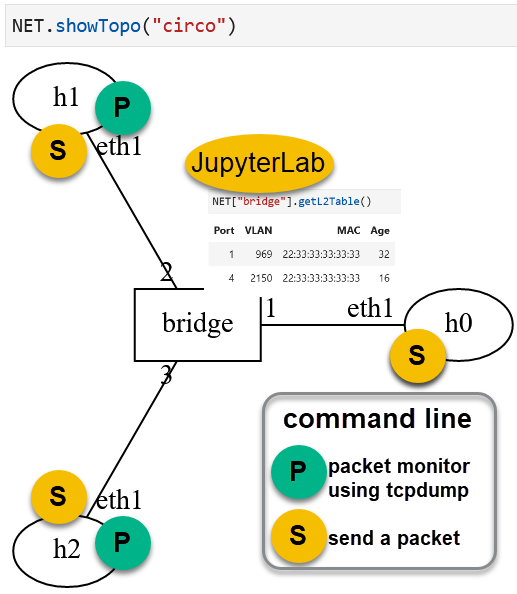
The environment includes two terminal screens sending packets, and two others listening on their interfaces to infer the bridge forwarding behavior. The lab notebook will be used to observe how bridge L2 table is populated with source MAC addresses of incoming packets.
Network Interfaces
Each host network interface sends and receives Ethernet packets.
The MAC address of an
interface can be displayed at the host command line using the ip link
command. Issue this command after ssh into a host
(e.g., gssh student01 host1 using your student login ID in the
lab system):
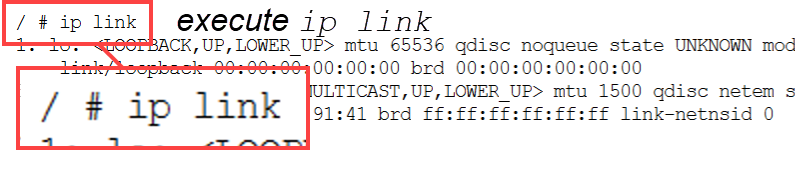
# ip link
The output will list all interfaces of the host along with the interface MAC addresses:
1: lo: <LOOPBACK,UP,LOWER_UP> mtu 65536 qdisc noqueue state UNKNOWN qlen 1
  link/loopback 00:00:00:00:00:00 brd 00:00:00:00:00:00
15749: eth1@if15748: <BROADCAST,MULTICAST,UP,LOWER_UP,M-DOWN> mtu 1500 qdisc netem state UP qlen 1000
    link/ether 36:40:ef:e6:26:ae brd ff:ff:ff:ff:ff:ff
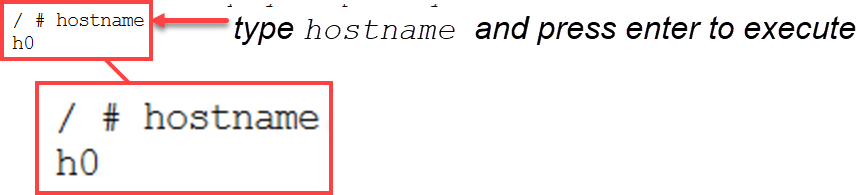
The command line interface to the hosts provides information as you type the command name and execute by pressing enter at the terminal:

For example, the host’s name can be displayed using the hostname
command. Typically, when interfacing with the nodes in your network
topology through the command line, taking a note of their name will
be helpful especially when working on larger topologies with many
hosts:
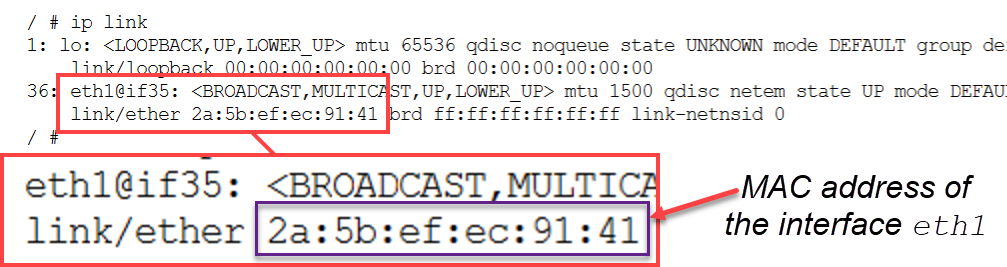
The ip link command displays a wealth of information about the host
interfaces:
The interfaces are listed for the host:
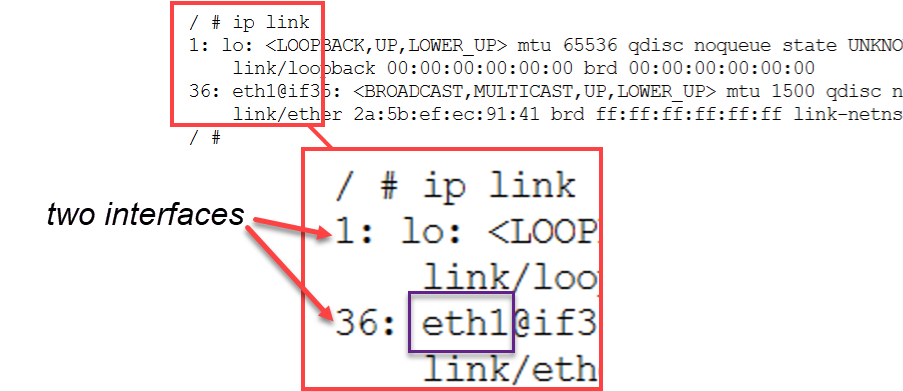
At the output, the eth1 interface MAC address can be located:
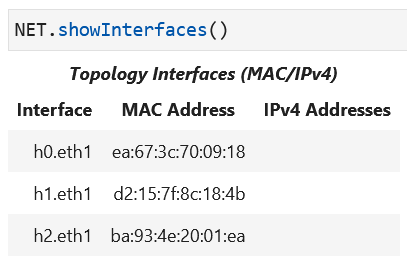
The interface name, configuration, and address information can be displayed for all nodes in your network using NET` as shown below:
NET.showInterfaces()
The lab notebook then will display a table:
Ethernet Bridge L2 Table
Ethernet bridges look up the destination MAC address in the L2 table in order to make a forwarding decision. The L2 table of the bridge is displayed using the NET function:
NET["bridge"].getL2Table()
Attention
The function NET provides
the handle to the overall topology. The node label is inserted into the
dictionary key field, NET["bridge"] to conduct status calls on that
node of the network. In this case, we are calling the method getL2Table()
to display the status of the L2 table of the Ethernet bridge in our
topology.
Please note that all methods end with () to run in the lab notebook.
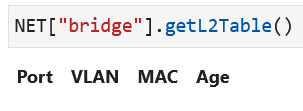
The bridge has an empty L2 table at the beginning of the experiment since no host has sent a packet in this network yet.
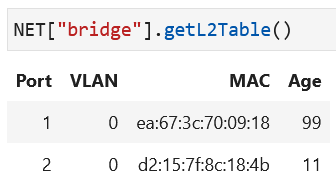
The L2 table has the columns: port number, VLAN tag, MAC address, and age time. A new row is added each time a new MAC address is learned from the source address field of an incoming packet. The port numbers that are present in the L2 table refer to the ports of the bridge at which a MAC address has been learned - some port numbers are not listed on the table because no MAC address is learned at those ports.

Bridge L2 Table is populated with the MAC address in the source MAC address field of the incoming packet at the port.
Similarly, as the other hosts start to send packets on their interfaces (and using their interface MAC address in the source field of the packets), more entries will show in the display for the layer 2 table of the bridge:
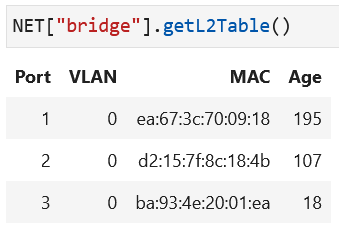
When all hosts have sent packets, the bridge will have all interface MAC addresses in its layer 2 table:
The VLAN tag is a configuration parameter for a port and unless configured otherwise,
the default value is 0. Aging time of a MAC address in the L2 table is another
configuration parameter for Ethernet bridges. The age time of a MAC address entry is
the duration of the time the entry will be in the table.
Attention
Aging Time of Bridge L2 Table Entries in Lab Topologies
All bridges in the labs of the course have the same configuration value for the entry aging time, and it is equal to 5 minutes. The L2 table will show an entry value that increases up until 300 sec and then that entry will be purged from the bridge L2 table.
Lab Task
Please execute NET["bridge"].getL2Table()
in your lab notebook to see the state of the L2 table of the bridge in your
topology.
Terminal Access
Use
File
New
Terminal
to open a new terminal on the lab server.
This CLI will be used to access the devices in the lab network topology
by ssh into these devices:
$ gssh <username> <device-name>
For example, a <username> can be dgurkan and the <device-name>
can be a host device named host1 in your lab network.
In order to ssh into
this device, type:
$ gssh dgurkan host1
on the terminal commmand line and press enter.
Sending Arbitrary Ethernet Packets using ethsend
A script called ethsend is available at the hosts to send Ethernet packets
on their network interfaces. The options of the script allows the user to set
custom fields in the packet Ethernet protocol header.
For example, at the command line of a host, the command:
# ethsend --src-mac 22:22:22:33:33:33 eth1
will send an Ethernet packet at the eth1 interface of the host with a
source MAC address of 22:22:22:33:33:33.
Attention
Linux Commands
Please note that in Linux command line, any command name may be appended
a configuration item called argument. Some arguments are required for
the command to successfully run. For example, the ethsend command for
this lab requires that you specify the interface at which to send a
packet on. The other arguments may be optional where the user may specify
the name of the argument to direct the command to configure when running.
For example, when using ethsend on a given interface, you have the
option to specify what the source and destination address of your packet
may be, whether the packet should be VLAN-tagged, and what payload to
include into the ethernet packet payload field. These optional arguments
are not required, as the name implies. When optional arguments are not
specified by the user, the command uses default values that are programmed
into its code.
Below is the help menu displayed in order to run the ethsend script:
# ethsend --help
usage: ethsend [-h] [--dst-mac DSTMAC] [--src-mac SRCMAC]
               [--eth-type ETHTYPE] [--vlan VLAN] [--eth-payload ETHPAYLOAD]
               intf

positional arguments:
  intf                  Host interface to send on

optional arguments:
  -h, --help            show this help message and exit
  --dst-mac DSTMAC      Sending an Ethernet packet to a destination MAC
                        address
  --src-mac SRCMAC      Source MAC address
  --eth-type ETHTYPE    Ethernet type
  --vlan VLAN           Packet VLAN ID
  --eth-payload ETHPAYLOAD
All options of running ./ethsend are listed in the table below:
|
When set, the provided MAC address is used as source MAC of packet |
|
When set, the provided MAC address is used as destination MAC of packet |
|
When provided, sets the Ethertype field of the packet |
|
When set, add the VLAN tag to the packet to be sent using 802.1q |
|
When set, add the specified payload to the packet |
|
The interface at which to send the packet, e.g., |
Default Values
When --src-mac is not set, the interface MAC address of the host is
used as source MAC address of packet.
When --dst-mac is not set, one
of 256 random destination addresses is used as the destination MAC address of packet.
Lab Task
Please ssh into one of the hosts in your topology. At the command line execute
the following two commands and observe the output displayed for the layer 2 table
of your topology bridge by running NET["bridge"].getL2Table() in your lab notebook:
ethsend --src-mac 44:44:66:66:44:44 --dst-mac AA:AA:BB:BB:AA:AA eth1
Using tcpdump to Capture Packets
The packet that is sent on an interface of a host can be observed using the tcpdump
tool at the host command line. The output of tcpdump will show the packets that are
sent and received on the interface specified in its arguments. More information about the
command line tool can be found on
tcpdump man page
The tcpdump command arguments that are used in the labs are:
specify the interface to monitor using
-i eth1argument,show ethernet frames using
-eargument,omit name resolution using
-nargument,display payload using
-Aargument,filter out the frames destined to the reserved MAC address for STP (Spanning Tree Protocol),
01:80:c2:00:00:00, to reduce the displayed traffic on terminal screen usingnot ether dst 01:80:c2:00:00:00,filter out the packets that carry any IPv6 protocol payloads by excluding the specific Ethertype value for IPv6:
not ether proto 0x86dd:# tcpdump -i eth1 -Ane not ether dst 01:80:c2:00:00:00 and not ether proto 0x86ddWhen executed, the screen will show:
# tcpdump -i eth1 -Ane not ether dst 01:80:c2:00:00:00 and not ether proto 0x86dd
tcpdump: verbose output suppressed, use -v or -vv for full protocol decode
listening on eth1, link-type EN10MB (Ethernet), capture size 262144 bytes
The output of the command shows that ethernet packets are being listened to on
the eth1 interface.
Attention
In order to stop tcpdump from displaying packets captured,
press the control and c keys at the same time on your keyboard. When
the program stops running, it will display a summary at the output and your
command line shell will appear:
/ # tcpdump -i eth1 -Ane not ether dst 01:80:c2:00:00:00 and not ether proto 0x86dd
tcpdump: verbose output suppressed, use -v or -vv for full protocol decode
listening on eth1, link-type EN10MB (Ethernet), capture size 262144 bytes
16:41:52.101651 86:7d:67:90:a1:6b (oui Unknown) > aa:bb:cc:dd:ee:8a (oui Unknown), ethertype Unknown (0x0820), length 19:
        0x0000:  6865 6c6c 6f                             hello
hello
^C
1 packet captured
1 packet received by filter
0 packets dropped by kernel
/ #
If a packet count has been specified in the
command argument list by using -c option (for example, -c 5 to capture 5 packets), the
tcpdump process will exit automatically when the total specified number of packets are
captured and displayed.
Lab Task
Please open two terminals. At each terminal, ssh into one of the hosts in your topology.
At one of the terminals, run the complete command for tcpdump
as given above to listen and display
ethernet frames. Verify that the tcpdump started to listen to the interface.
At the other terminal, run the ethsend script: Pick eth1 interface, assign
the MAC address 44:44:66:66:44:44 to the source MAC address, and assign the MAC
address AA:AA:BB:BB:AA:AA to the destination MAC address, and send the packet.
Examine the output on the screen where tcpdump is running to see the packet sent
by the host at its own interface.
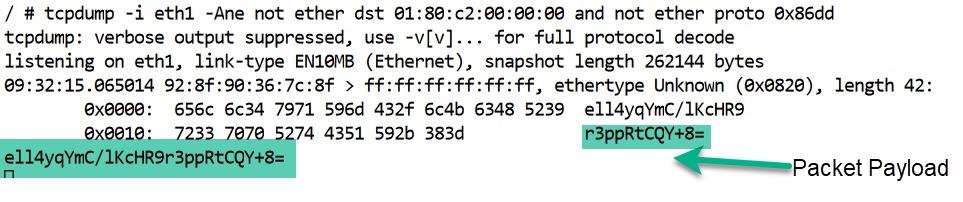
Example: Let’s examine one tcpdump output and identify the header fields of the Ethernet packet displayed at its output:
 1tcpdump -i eth1 -Ane not ether dst 01:80:c2:00:00:00 and not ether proto 0x86dd
 2...
 3
 405:19:11.136782 1e:59:44:cd:4c:71 > aa:bb:cc:dd:ee:fc, ethertype Unknown (0x0820), length 42:
 5        0x0000:  3631 3354 6535 6c55 7857 7771 5178 4662  613Te5lUxWwqQxFb
 6        0x0010:  6d33 6d76 4763 3770 424b 733d            m3mvGc7pBKs=
 7613Te5lUxWwqQxFbm3mvGc7pBKs=
 8^C
 91 packet captured
101 packet received by filter
110 packets dropped by kernel
12/ #
The first part of the displayed output shows the time of the packet capture,
starting text in the 4th line above: 05:19:11.136782.
On that same line, next comes the source and destination MAC addresses separated
by > showing the from MAC 1e:59:44:cd:4c:71, and to MAC aa:bb:cc:dd:ee:fc.
The ethertype field is followed by the length and the packet contents, namely, the payload.
timestamp |
source MAC |
to |
destination MAC |
type |
payload |
|---|---|---|---|---|---|
|
|
|
|
|
|
The tcpdump process is stopped by pressing Ctrl-C on the keyboard.
The bridge will learn the source address of the packet. The L2 table of the bridge will have an entry with this MAC address for the incoming port.
Lab Task
Please send a packet from a host while running tcpdump at that
same host on a different terminal. Fill in the packet fields into the table below based
on the output of tcpdump:
timestamp |
source MAC |
to |
destination MAC |
type |
payload |
|---|---|---|---|---|---|
Learning Activities
The activities below are suggested tasks to gain insight into the Ethernet protocol behavior.
Step 1
Setup the lab environment as described.
Step 2
Check the state of the bridge L2 table to verify that it is empty at the beginning.
Step 3
In this phase of the experiment, pick a host to be the packet sender. Arrange
your terminal windows for the other two hosts in such a way that you can observe
tcpdump output on the screen side by side.
3a. Please send a packet from the sender host to various destination MAC addresses:
ethsend --dst-mac aa:bb:cc:dd:ee:01 eth1
ethsend --dst-mac aa:bb:cc:dd:ee:02 eth1
ethsend --dst-mac aa:bb:cc:dd:ee:03 eth1
ethsend --dst-mac aa:bb:cc:dd:ee:04 eth1
The script will use the interface MAC address of the host per default option when sending these packets. Retrieve the L2 table of the bridge on a consecutive cell on your lab notebook.
3b. Observations: What do you see at the output of tcpdump
running at the other two hosts?
3c. Observations: Is there a match with any of the destination MAC addresses of these packets in the bridge L2 table?
Step 4
In this phase, prepare to have two sender hosts while on three other separate
windows you can observe tcpdump output for all three hosts.
- 4a. Please send a packet from one of the senders. Mark what MAC address
has just been added to the L2 table of the bridge by retrieving the table on your lab notebook screen. Copy the newly-added MAC address when you run the labscript as the destination MAC address on the other sender host. Send the frame while watching the
tcpdumpscreens.
4b. Observations:
Which hosts did you see the packet being received at?
Did the bridge flood or directly forward this packet?
Step 5: Lab1 Homework Submission
STOP! Did you practice this week’s material using the %practice facility in your notebook?
Please solve the question(s) and make sure to receive a Correct! response in all questions
before you attempt to submit your assignment.
There are two steps to complete your assignment:
1. In your lab notebook, run:
%homeworkto complete and submit this portion.
2. In your notebook, run:
%exerciseto solve the question(s) and submit this portion.
Lab Completion
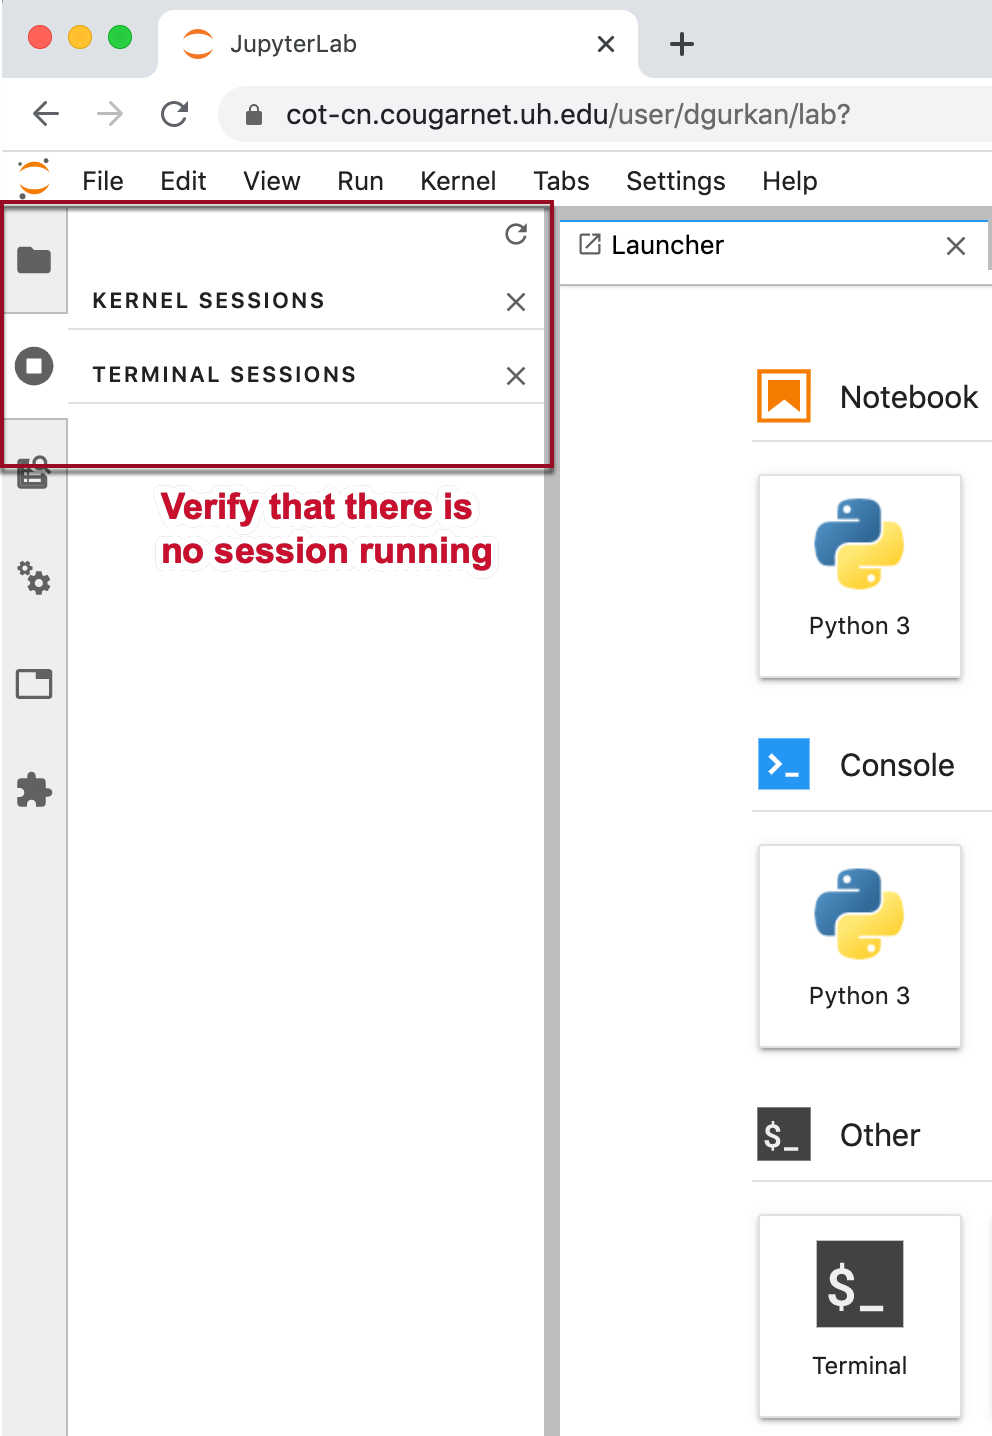
Every lab should be completed by following the instructions below on how to delete the network topology resources and the running processes on the lab service.
Delete all reserved resources for the lab by executing the %delete command in a cell.

Type exit and then press Enter at the terminal
and verify that the terminal application also closes.
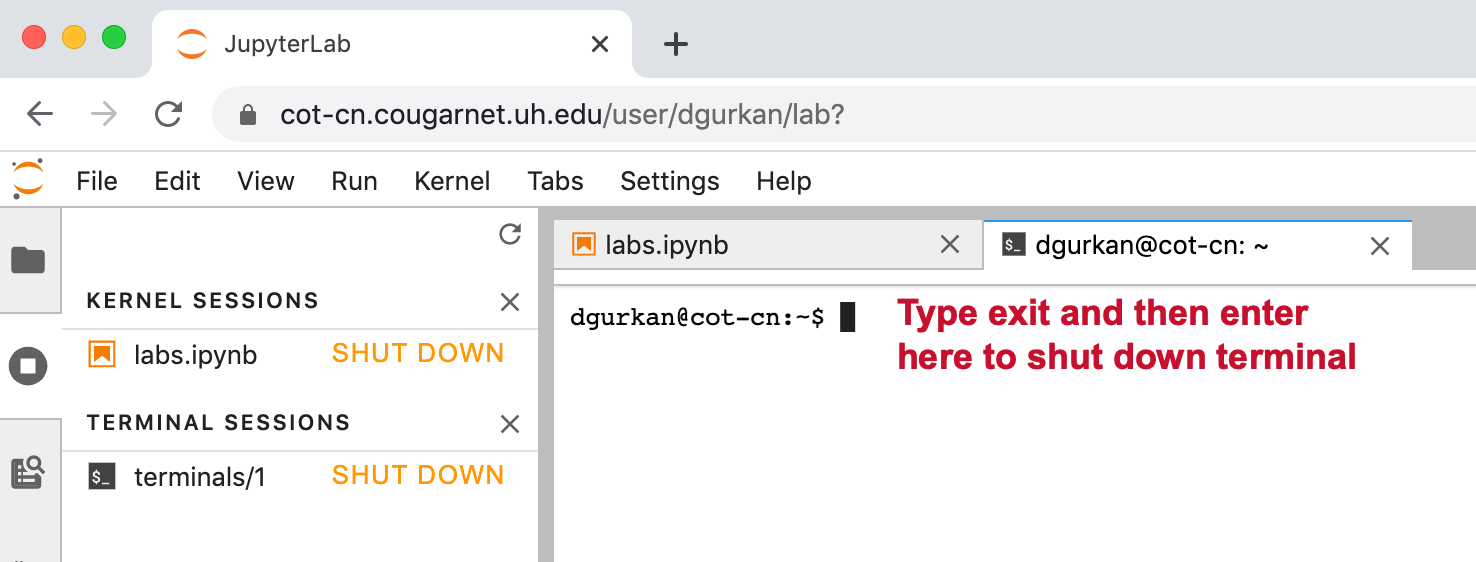
When you are done with your work on a lab notebook, there should be no running sessions as shown in this view.